- Antiquities System in ESO
- Leads
- Where to find Leads and Leveling
- Scrying
- Excavation
- Mythic Item Leads Location
- Ring of the Wild Hunt
- Thrassian Stranglers
- Malacaths Band of Brutality
- Snow Teaders
- Bloodlords Embrace
- Torc of Tonal Constancy
- Mythic Items in The Reach & Blackreach: Arkthzand Cavern
- Mythic Items in Blackwood
- Mythic Items in High Isle & Amenos
- Mythic Items in Galen and Y'ffelon
- Necrom Mythic Items
- Necrom Antiques
Antiquities System in ESO
The Antiquities system in The Elder Scrolls Online allows you to find treasures, relics and knowledge hidden around the world of Tamriel (most zones), to be able to use it you need an active ESO Greymoor Chapter.
It is important to note that although the Antiquities System is only available to Greymoor Chapter owners, it is not limited to the Skyrim Zone, but covers most of the lands available in ESO, including those available in DLCs.
The list of potential finds is extensive and includes new and unique Markings, Adornments, Emotes, three new Ancestral motifs, siege weapons called Magicka Lances, Ebon Dwarven Wolf mount lot of new furnishings and in particular six possible one item Mythic Sets.
Especially at higher difficulty levels, the Antiquities System is a great source of gold in the game, because some of the finds can be sold, and in addition to the main find we find additional items. Within a few days, with no problem I dig up 100K gold worth of items, and the developers ensure that the value of items I can find exceeds 300K gold.
Antiquities has two new skill lines
- Scrying - uncover hidden loot location
- Excavation - digging a treasure
How to start Antiquities
To start recover lost artifacts you have to:
- Own ESO Greymoor Chapter
- Go to Solitude City in Western Skyrim
- Find and talk to Verita Numida in Antiquarians Circle
- Get Antiquarian's Eye tool
- Get and finish The Antiquarian Circle Quest
- Get and finish The Antiquarian's Art Quest - tutorial
Leads
Every antiquity you want to find and dig, has its own Lead. Lead contains information about the name of the searched object, what type it is, where you can use it and what is the difficulty in finding it.
After you finish starting quests for Antiquarians Circle you will got new tab in your Quest Journal: Antiquities, there you can check what Leads you have.
Each Lead is assigned to a specific Zone and can only be used there. Each Zone has one basic free Lead that you can find in Quest Journal: Antiquities, they are reusable.
All other Leads are one time use, however you can find them many times. Some, the most powerful items require up to 5 separate Leads to dig them up completely.
Leads are account bound and are not tradable. They are up to date for 30 days, then disappear. You can find them again.
To be able to find high level (best) Leads you have to have a high level Scrying Skill Line, especially a skill Antiquarian Insight.
- Green - Basic - you will earn 1 exp, its possible at lvl 1
- Blue - Intermediate - you will earn 3 exp, its possible at lvl 3
- Purple - Advanced - you will earn 5 exp, its possible at lvl 5
- Gold - Master - you will earn 10 exp, its possible at lvl 7
- Orange - Ultimate - you will earn 10 exp, its possible at lvl 10
Leads Difficulty Levels
- Mythic Items - each item need 5 separate leads to complete
- Furniture - Antiquity Furnishings, Maps and Music Box.
- Motifs - Ancestral High Elf, Ancestral Orc and Ancestral Nord
- Mount - Ebon Dwarven Wolf
- Cosmetics - Body and Face Markings, Crown, Coronet
- Emotes - Alinor Allemande
- Siedge Weapons - Magicka Lances
- Treasures - to sell for gold, Green 250 gold, Blue 1000 gold, Purple 5000 gold.
Lead Types
Sources of Leads and Leveling
Leads are assigned to a specific Zone, which means that you can only find them in a given area. To access all Leads you will need all Chapters and DLCs so ESO+ is required.
"Free" Leads are in your Antiquities System from the beginning. You get one Free Green (Basic) Lead for almost every zone you have access to.
After finding and digging Green (Basic) Lead, you'll receive the Blue (Intermediate) Lead as a reward, after finding and digging it you'll get Purple (Advanced) Lead. After finding and digging Purple you can start again Scry Free Green Lead for each Zone and again you'll get Blue and then Purple Leads.
This is a simple way for Leveling of Scrying and Excavation Skill Lines without having to search for hidden Leads.
There is a popular theory among the ESO community that all (leveling) is worth doing only in Artaeum, because the land is small and it is easy to move around. In my opinion, there is no such need and it is boring and tiring.
You can easily go around all the lands available to you and dig up Free Green leads for them. In the next circuit you can do the same with Blue and then Purple Leads.
To gain experience points in Scrying and Excavating Skill Lines, you have to complete a full Scrying and Excavating cycle for a specific item and bring it out successfully.
Lead Locations
- Free Green Leads from Antiquities System
- Free Blue Leads from diging Blue Leads
- Free Purple Leads from diging Blue Leads
- Treasure Maps - finding Treasure Chests from Treasure Maps are a source of most Motifs Leads
- Inn Vendors - in every inn (most zones) you can buy Green Lead for 1000gp if you got Pathfinder Achievment for this zone.
- Public Dungeons Bosses - chance for Purple and above Lead
- Safeboxes - chance for Purple and above Lead
- Thieves Troves - chance for Purple and above Lead
- Raw Material Nodes - chance for random Leads
- Random Mobs - chance for random Leads
- Psijic Portals - chance for random Leads
- Fishing - chance for specific Leads
- Some Delve Bosses - chance for specific Leads
- Some rare NPCs - chance for specific Leads
- Specific Bosses - most of Mythic Items Leads are from specific Boss or Bosses in specific locations (see below)
So you can get most Leads through various activities in a particular Zone.
Scrying
Scrying is a mini game of locating the dig site where Antiquitie is buried.
To start Scrying in a given Zone you must have a unused or repetable Lead assigned to this Zone.
At first, Scrying looks like a difficult process, and its level of complication increases with the Lead level, but that's just a semblance.
The most important is raising the level in Scrying Skill Line, the next skills make the Scrying process much easier and at high levels it becomes very easy.
Actually, you can win the mini-game of Scrying entirely using only Coalescence Skill (whose power increases with levels) and single clicks.
Excavation
Excavation consists of two steps, first finding dig site and second extraction of treasure.
When locating dig site you should have your Antiquarian's Eye fitted in quickslot, using it you get tips on where to look.
When you find the dig site, the second mini game - extraction begins. You must excavate the artifact. In addition to the main relic, you have the chance to find additional treasures.
If you fail to extract the artifact the first time, you can try again looking for another dig site in the same region.
Excavation also looks like a complicated procedure whose difficulty increases with the treasure level, but the truth is that it all depends on the level you have in the Excavation Skill Line. And at the end everything becomes very simple.
Advanced tools are unlocked at higher levels of Excavation Skill Line.
- First use Angur to locate place to dig.
- Then use two time Hand Brush Skill for rising Intuition points and leveling the ground.
- Next use Heavy Shovel to remove large layer of soil.
- Next repeat 2 times Hand Brush to generate Intuition and then Heavy Shovel again.
- Trowel i great for removing gas sources
If you fail to dig up an item, find another dig site within the same area to try again.
Mythic Item Leads Location Maps
You have to find five separate leads for each Mythic Item.
You can only use one Mythic Item at a time.
Drop chance is random.
Ring of the Wild Hunt Leads
One Item Set The Ring Of The Wild Hunt - Increases your movement speed by 15% while in combat. Increases your movement speed by 45% while out of combat.

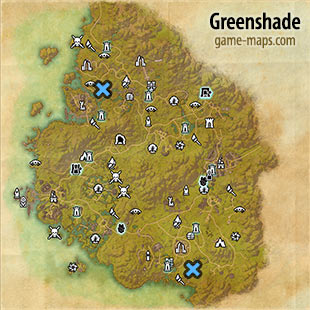
Symbol of Yffre Lead Locations
Zone: Greenshade
Location: Pelda Tarn or Thodundor's View World Bosses.
My attempts to succeed: 1
Info: Solo or Group, I tried Pelda Tarn only once and I succeeded, maybe I was lucky.

Face of the Serpent Lead Locations
Zone: Gratwood
Location: Elden Hollow I Group Dungeon - Canonreeve Oraneth Boss
My attempts to succeed: 3
Info: Group, this is an easy dungeon, Canonreeve Oraneth is last Boss.
Band of Water Lead Locations
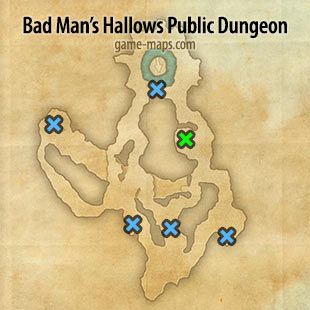
Zone: Glenumbra
Location: Bad Man’s Hallows Public Dungeon Boss
My attempts to succeed: 1
Info: Solo or group, any Boss in this dungeon, my was Skitterflame.
Charm of the Shapeless Lead Locations
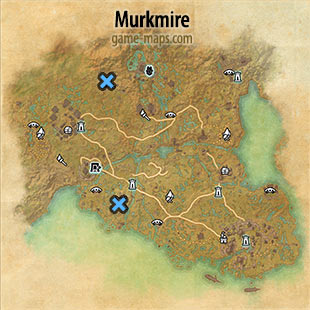
Zone: Murkmire
Location: Bok-xul or Echoing Hollow World Bosses
My attempts to succeed: 3
Info: Group of solo, drop was on Bok-xul.
Face of the Wolf Beast Lead Locations
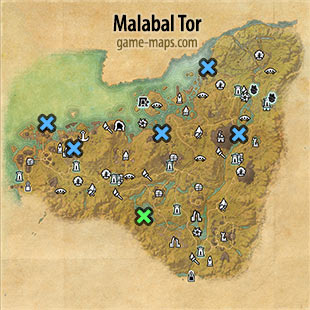
Zone: Malabal Tor
Location: Any World Boss
My attempts to succeed: 8
Info: Group or Solo, my drop was from Bone Grappler Nest
Thrassian Stranglers Leads
One Item Set The Thrassian Stranglers - Killing an enemy grants you a persistent stack of Sload's Call, up to a maximum of 20 stacks. Each stack increases your Spell Damage by 150, but also increases your damage taken by 2%. Removing Thrassian Stranglers, crouching, or going invisible removes all stacks of Sload's Call.
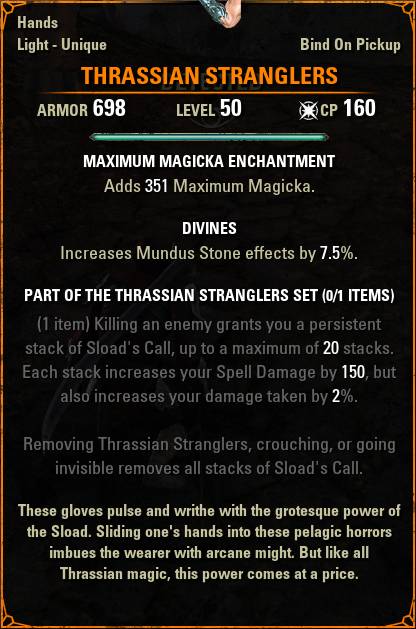

Nautilus Shell Gaurds Lead Locations
Zone: Summerset
Location: Karnwasten Public Dungeon - Gilleruk the Viscous
My attempts to succeed: 1
Info: Solo or Group, it is highly likely that other Bosses in Karnwasten also drop this lead.
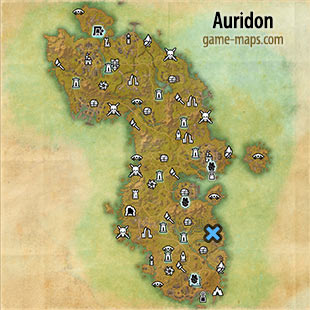
Inert Anemone Inlay Lead Locations
Zone: Auridon
Location: Soulfire Plateau World Boss
My attempts to succeed: 4
Info: Group, other Bosses in Auridon will probably also be OK
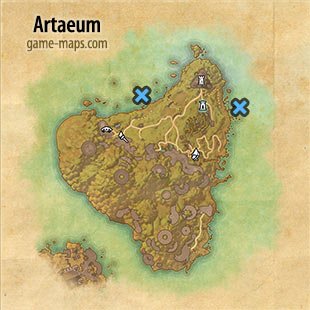
Coral Planting Lead Locations
Zone: Artaeum
Location: Fishing Saltwater
My attempts to succeed: 2 hours, about 100 Worms, Saltwater Baits
Info: Solo, it was quite tiring ... there are about 9 fishing spots in Artaeum, and there were about 10,000 fishermen.
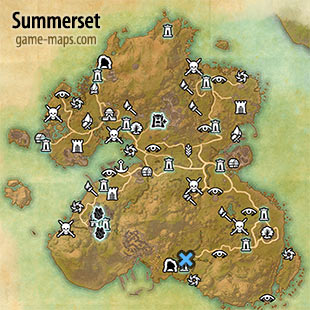
Sticky Integument Leather Lead Locations
Zone: Eyevea (Artauem or Summerset)
Location: Psijic portal in Summerset or Artauem
My attempts to succeed: 1
Info: I got it on first try in Psijic Portal near road to Sunhold in Summerset. Psijic Portals are in a fixed same location.
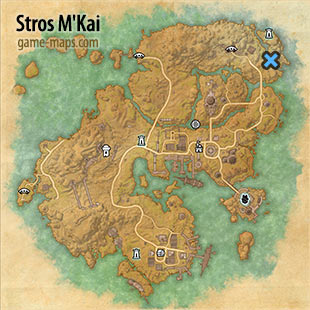
Bouyant Steel Lead Locations
Zone: Stros M'Kai
Location: Fishing Saltwater
My attempts to succeed: 15 minutes of fishing
Info: There are lot of saltwater fishing spots in Stros M'Kai, I take north one.
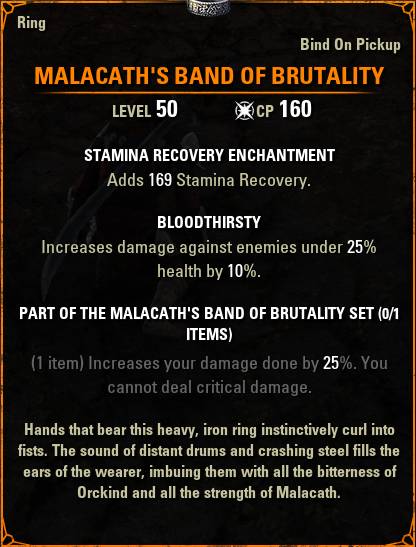
Malacaths Band of Brutality Leads
One Item Set The Malacath's Band Of Brutality - Increases your damage done by 25%. You cannot deal critical damage.
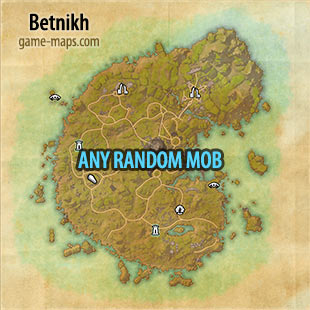
Malacaths Brutal Scourge Hoop Lead Locations
Zone: Betnikh
Location: Random Mob for me it was Wasp, but its random.
My attempts to succeed: 3 hours of killing
Info: Solo, it was frustrating but you have to believe that a millionth killed Mob will have a drop. The bright side is that I have collected many other interesting things, including other Leads.
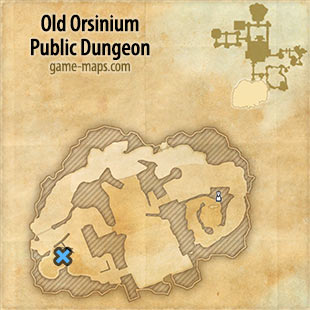
Malacaths Brutal Might Loop Lead Locations
Zone: Wrothgar
Location: Any Old Orsinium Public Dungeon Boss for me it was Great Zoraluma
My attempts to succeed: 3
Info: Group or Solo
Malacaths Brutal Ritual Oil Lead Locations
Zone: Stormhaven
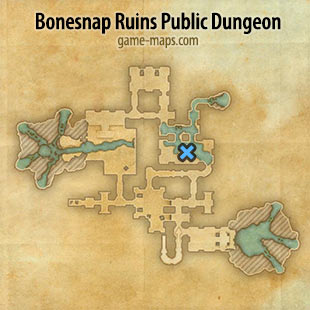
Location: Any Bonesnap Ruins Public Dungeon Boss for me it was Lughar
My attempts to succeed: 1
Info: Group or Solo
Malacaths Brutal Rune Core Lead Locations
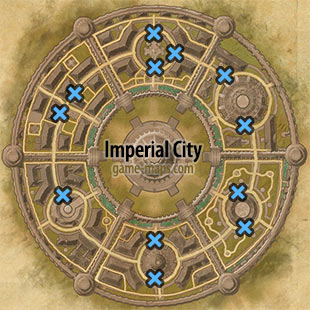
Zone: Bal Foyen (Imperial City)
Location: Imperial City Upper Bosses (Patrolling Horrors)
My attempts to succeed: no success, but the information is correct
Info: Large Group, this one is hard one, you have to kill one of Imperial City Upper Bosses (Patrolling Horrors): Amoncrul, Baron Thirsk, Glorgoloch the Destroyer, Immolator Charr, King Khrogo, Lady Malygda, Mazaluhad, Nunatak, The Screeching Matron, Volghass, Ysenda Resplendent, Zoal the Ever-Wakeful
Malacaths Brutal Ritual Dust Lead Locations
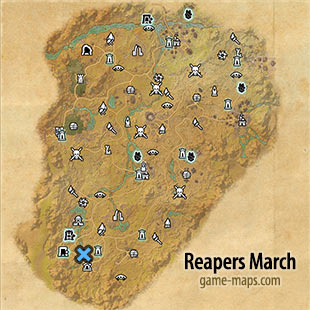
Zone: Reapers March
Location: Waterdancer Falls World Boss
My attempts to succeed: 20 (no luck?)
Info: Group, there are 3 of them hard for me to kill it solo.
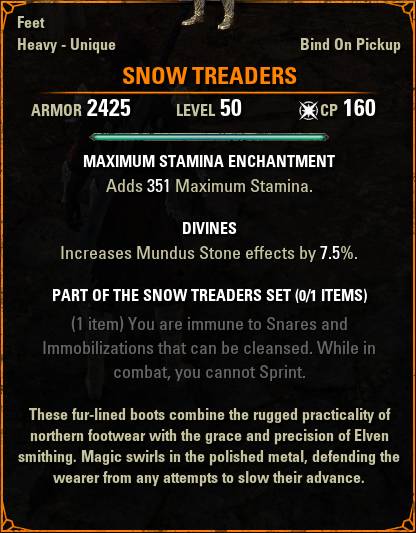
Snow Teaders Leads
One Item Set The Snow Treaders - You are immune to Snares and Immobilizations that can be cleansed. While in combat, you cannot Sprint
Snowy Sabre Cat Fur Strip Lead Locations
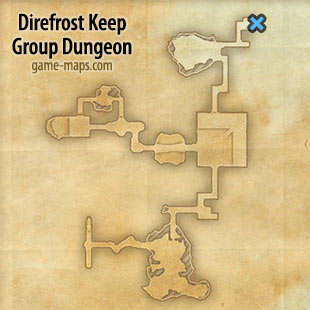
Zone: Eastmarch
Location: Direfrost Keep Group Dungeon - Drodda of Icereach Last Boss
My attempts to succeed: 4
Info: Group, its last Boss.
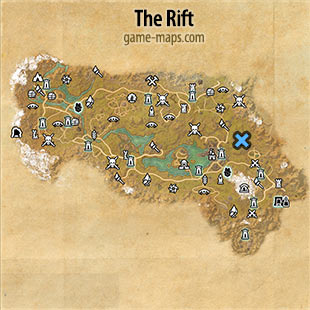
Petrified Snow-Cedar Lead Locations
Zone: The Rift
Location: Giant Camp World Boss
My attempts to succeed: 2
Info: Group or Solo
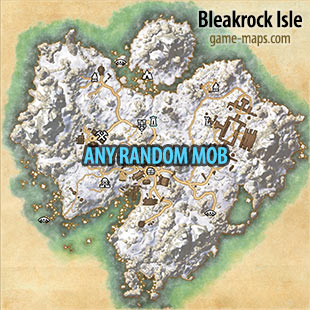
Auri-El Metal Carvings Lead Locations
Zone: Bleakrock Isle
Location: Any Random Mob - for me it was Bear
My attempts to succeed: 30 minutes
Info: Solo
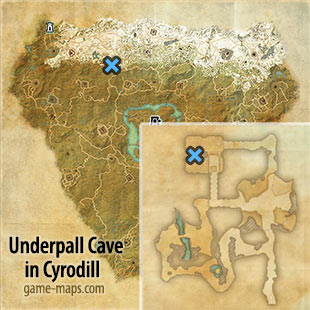
Magicka-Imbued Metal Plates Lead Locations
Zone: Coldharbour (Cyrodill)
Location: Underpall Cave in Cyrodill - Raelynne Ashham Boss
My attempts to succeed: 2
Info: A trip full of emotions in the land of PvP. You must remember that this information is also known to other players, so I will be very surprised if you do not meet anyone there :). I did it like this: I hid around the corner, waited for the currently dominant group to attack the Boss, fired a bow, sprinted to the corpse ... and died. It worked the second time.
Glacial Metal Rivets Lead Locations
Zone: Western Skyrim
Location: Any Boss in Labyrinthian for me it was Blackmaw.
My attempts to succeed: 2
Info: Group or Solo (some are hard to solo). Here are Bosses in Labyrinthian
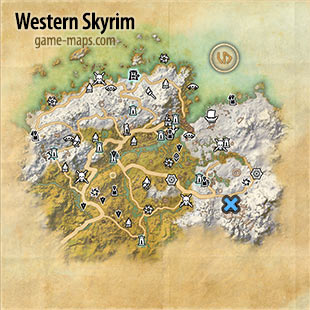
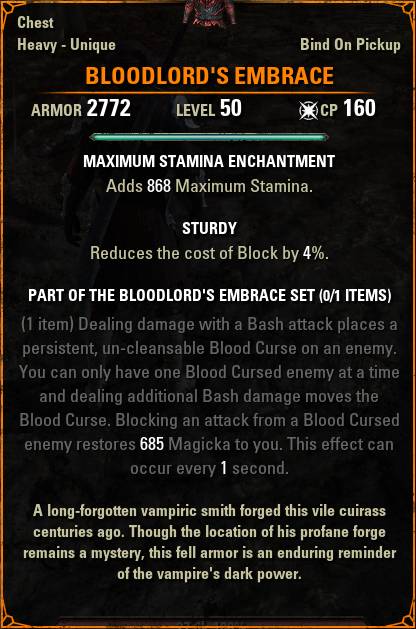
Bloodlords Embrace Leads
One Item Set The Bloodlord's Embrace Set - Dealing damage with a Bash attack places a persistent, un-cleansable Blood Curse on an enemy. You can only have one Blood Cursed enemy at a time and dealing additional Bash damage moves the Blood Curse. Blocking an attack from a Blood Cursed enemy restores 685 Magicka to you. This effect can occur every 1 second.
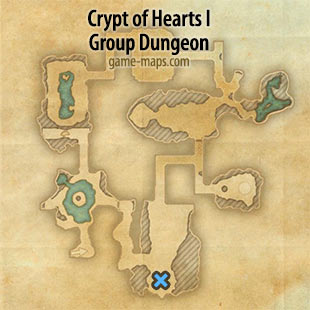
Thirsting Girdle Lead Locations
Zone: Rivenspire
Location: Crypt of Hearts I Group Dungeon - Illabris Athro
My attempts to succeed: 4
Info: Group, Illabris Athro is last boss.
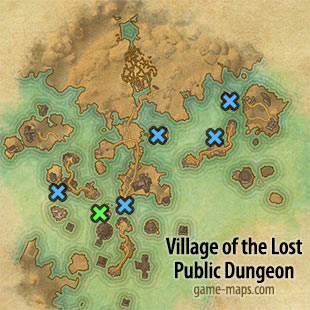
Sanguine Doublet Lead Locations
Zone: Coldharbour
Location: Village of the Lost Public Dungeon - Any Boss - my was Aez the Collector
My attempts to succeed: 8
Info: Solo or Group
Goblet Gorget Lead Locations
Zone: Glenumbra
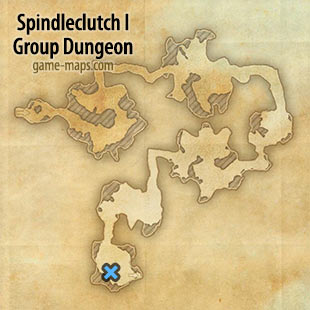
Location: Spindleclutch I Group Dungeon - The Whisperer Boss
My attempts to succeed: 3
Info: Group, its last Boss
Fanged Cuirass Lead Locations
Zone: Shadowfen
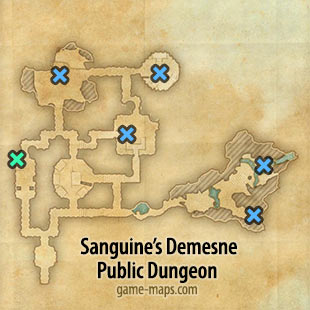
Location: Sanguine’s Demesne Public Dungeon - Any Boss - my was Shrom
My attempts to succeed: 1
Info: Solo or Group

Hecatomb Tassets Lead Locations
Zone: Khenarthis Roost (Imperial City)
Location: Imperial City Sewers - any Boss
My attempts to succeed: no success, but the information is correct
Info: Large Group, this one is hard one, you have to kill one of Imperial City Sewers Bosses: Emperor Leovic, General Kryozote, Hzu-Hakan, Lady of the Depths, Gati the Storm Sister, General Zamachar, Otholug gro-Goldfolly, Taebod the Gatekeeper, Ebral the Betrayer, General Nazenaechar, Secundinus the Despoiler, Wadracki.
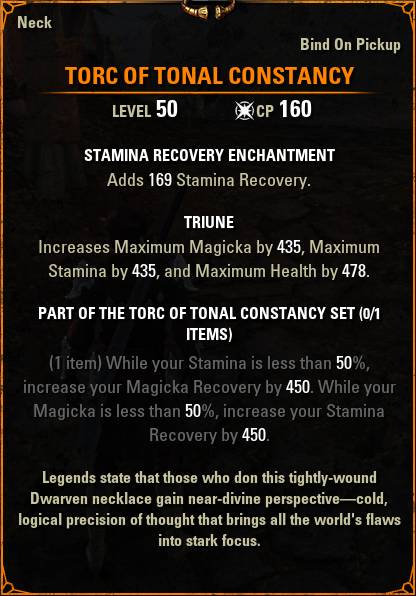
Torc of Tonal Constancy Leads
One Item Set The Torc Of Tonal Constancy - While your Stamina is less than 50%, increase your Magicka Recovery by 450. While your Magicka is less than 50%, increase your Stamina Recovery by 450
Torc Strand of Lore Lead Locations
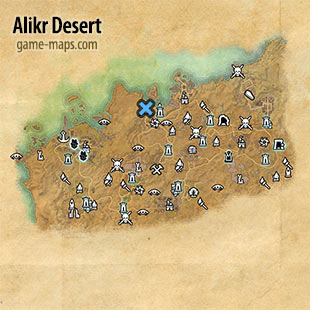
Zone: Alikr Desert
Location: Forsaken Heart's Cave - Korignah Boss
My attempts to succeed: 3
Info: Group or Solo
Torc Strand of Song Lead Locations
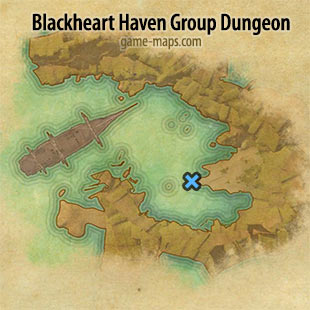
Zone: Bangkorai
Location: Blackheart Haven Group Dungeon - Captain Blackhaert its last boss
My attempts to succeed: 2
Info: Group
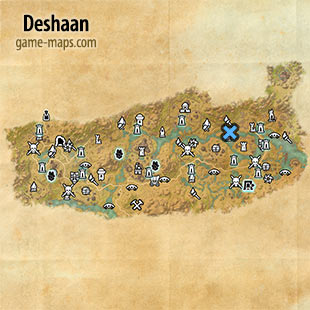
Torc Strand of Power Lead Locations
Zone: Deshaan
Location: Druitularg's Ritual Altar World Boss
My attempts to succeed: 4
Info: Group, you can also try Short Tusk's Hillock and Grove of the Abomination World Bosses
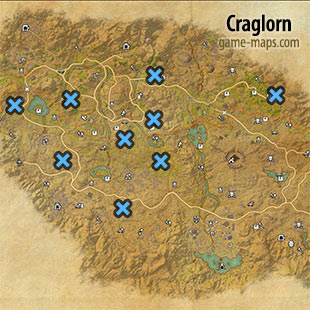
Torc Throat Guards Lead Locations
Zone: Craglorn
Location: Anka-Ra Burial Site Bosses or Nirncrux Mine Bosses
My attempts to succeed: no success, but the information is correct
Info: Group, Anka-Ra's Avowal, Anka-Ra's Crucible, Anka-Ra's Mettle, Anka-Ra's Plight, Anka-Ra's Vigil, Defunct Nirncrux Mine, Neglected Nirncrux Mine, Overrun Nirncrux Mine, Pillaged Nirncrux Mine, Secluded Nirncrux Mine
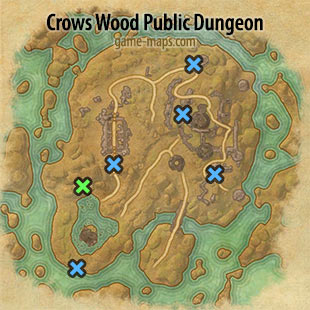
Torc Tonal Focus Lead Locations
Zone: Stonefalls
Location: Crows Wood Public Dungeon - All Bosses my was Buron
My attempts to succeed: 5
Info: Solo or Group
Mythic Items in The Reach & Blackreach: Arkthzand Cavern
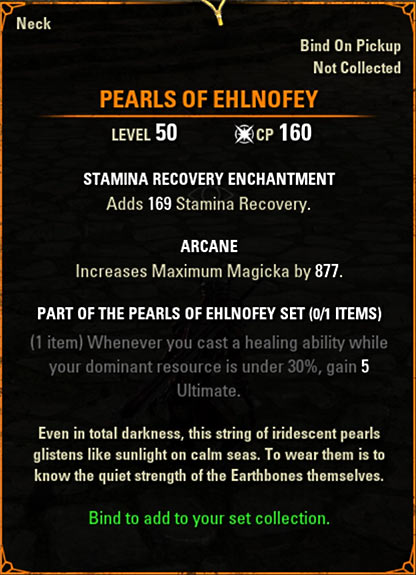
Pearls Of Ehlnofey
Neck: Adds 169 Stamina Recovery, ARCANE Increases Maximum Magicka by 877.
Part of The Pearls of Ehlnofey Set (0/1 Items)
(1 item) Whenever you cast a healing ability while your dominant resource is under 30%, gain 5 Ultimate.
Even in total darkness, this string of iridescent pearls glistens like sunlight on calm seas. To wear them is to know the quiet strength of the Earthbones themselves.
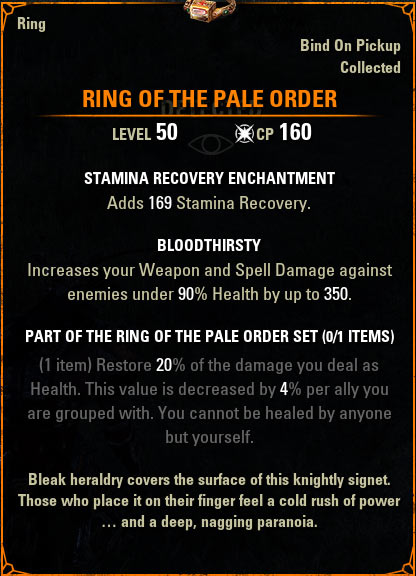
Ring of The Pale Order
Ring : Adds 169 Stamina Recovery, BLOODTHIRSTY Increases your Weapon and Spell Damage against enemies under 90% Health by up to 350.
Part of The Ring of The Pale Order Set (0/1 Items)
(1 item) Restore 15% of the damage you deal as Health. You cannot be healed by anyone but yourself.
Bleak heraldry covers the surface of this knightly signet. Those who place it on their finger feel a cold rush of power ... and a deep, nagging paranoia.
Mythic Items in Blackwood
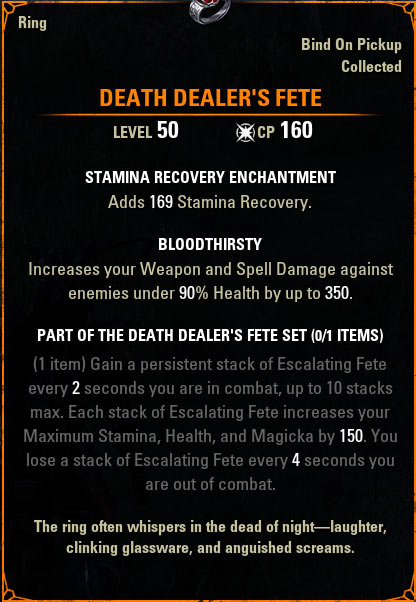
Death Dealer's Fete
Ring: Adds 169 Stamina Recovery, BLOODTHIRSTY Increases your Weapon and Spell Damage against enemies under 90% Health by up to 350.
Part Of The Death Dealer's Fete Set (0/1 Items)
(1 item) Gain a persistent stack of Escalating Fete every 2 seconds you are in combat, up to 10 stacks max. Each stack of Escalating Fete increases your Maximum Stamina, Health, and Magicka by 150. You lose a stack of Escalating Fete every 4 seconds you are out of combat.
The ring often whispers in the dead of night-laughter, clinking glassware, and anguished screams.

Gaze Of Sithis
Head Heavy: Adds 868 Maximum Stamina, DIVINES Increases Mundus Stone effects by 9.1%.
Part Of The Gaze Of Sithis Set (0/1 Items)
(1 item) Adds 5000 Maximum Health
(1 item) Adds 500 Health Recovery
(1 item) Adds 10760 Armor
(1 item) Reduces your Block Mitigation to 0.
Looking into the vacant eye sockets of his macabre mask fills even the bravest hearts with dread.
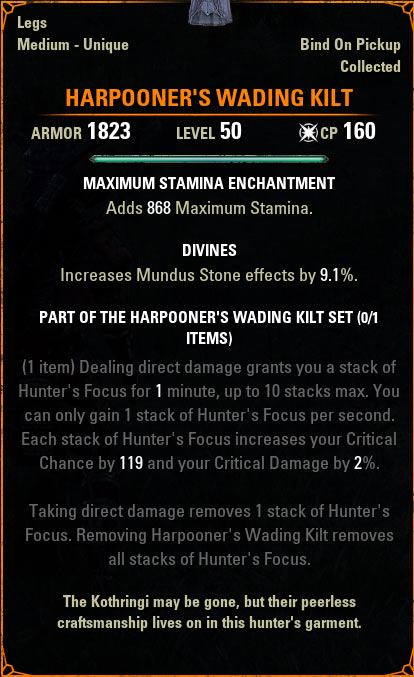
Harpooner's Wading Kilt
Legs Medium: Adds 868 Maximum Stamina, DIVINES Increases Mundus Stone effects by 9.1%.
Part Of The Harpooner's Wading Kilt Set (0/1 Items)
(1 item) Dealing direct damage grants you a stack of Hunter's Focus for 1 minute, up to 10 stacks max. You can only gain 1 stack of Hunter's Focus per second. Each stack of Hunter's Focus increases your Critical Chance by 119 and your Critical Damage by 2%. Taking direct damage removes 1 stack of Hunter's Focus. Removing Harpooner's Wading Kilt removes all stacks of Hunter's Focus.
The Kothringi may be gone, but their peerless craftsmanship lives on in this hunter's garment.
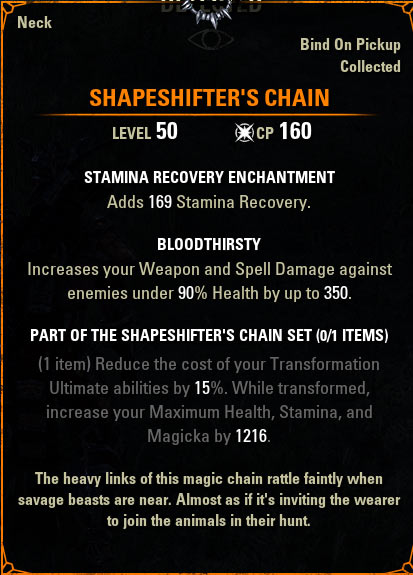
Shapeshifter's Chain
Neck: Adds 169 Stamina Recovery, BLOODTHIRSTY Increases your Weapon and Spell Damage against enemies under 90% Health by up to 350.
Part Of The Shapeshifter's Chain Set (0/1 Items)
(1 item) Reduce the cost of your Transformation Ultimate abilities by 15%. While transformed, increase your Maximum Health, Stamina, and Magicka by 1216
The heavy links of this magic chain rattle faintly when savage beasts are near. Almost as if it's inviting the wearer to join the animals in their hunt.
Mythic Items in High Isle & Amenos
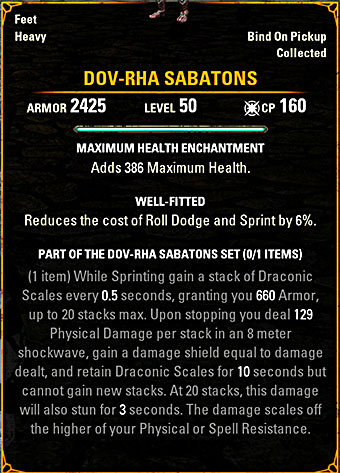
Dov-Rha Sabatons
Feet Heavy: Adds 386 Maximum Health. WELL-FITTED Reduces the cost of Roll Dodge and Sprint by 6%.
PART OF THE DOV-RHA SABATONS SET (0/1 ITEMS)
(1 item) While Sprinting gain a stack of Draconic Scales every 0.5 seconds, granting you 660 Armor, up to 20 stacks max. Upon stopping you deal 129 Physical Damage per stack in an 8 meter shockwave, gain a damage shield equal to damage dealt, and retain Draconic Scales for 10 seconds but cannot gain new stacks. At 20 stacks, this damage will also stun for 3 seconds. The damage scales off the higher of your Physical or Spell Resistance.
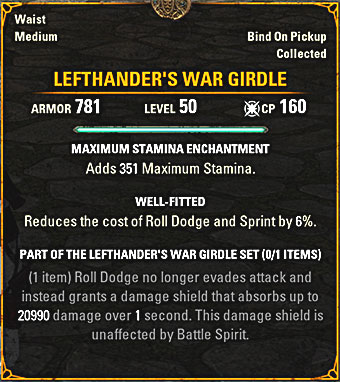
Lefthander's War Girdle
Waist Medium: Adds 351 Maximum Stamina WELL-FITTED Reduces the cost of Roll Dodge and Sprint by 6%.
PART OF THE LEFTHANDER'S WAR GIRDLE SET (0/1 ITEMS)
(1 item) Roll Dodge no longer evades attack and instead grants a damage shield that absorbs up to 20990 damage over 1 second. This damage shield is unaffected by Battle Spirit.
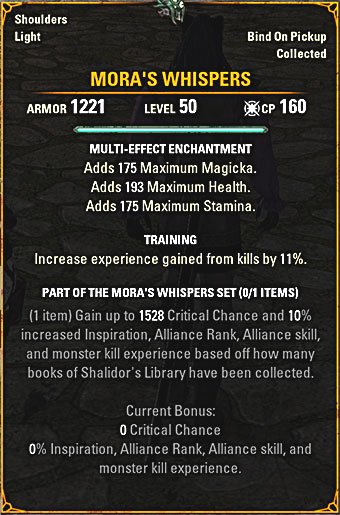
Mora's Whispers
Shoulders Light: MULTI-EFFECT ENCHANTMENT Adds 175 Maximum Magicka. Adds 193 Maximum Health. Adds 175 Maximum Stamina. TRAINING Increase experience gained from kills by 11%.
PART OF THE MORA'S WHISPERS SET (0/1 ITEMS)
(1 item) Gain up to 1528 Critical Chance and 10% increased Inspiration, Alliance Rank, Alliance skill, and monster kill experience based off how many books of Shalidor's Library have been collected.
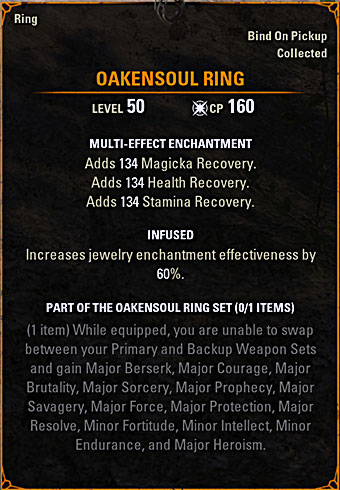
Oakensoul Ring
Ring: MULTI-EFFECT ENCHANTMENT Adds 134 Magicka Recovery. Adds 134 Health Recovery. Adds 134 Stamina Recovery. INFUSED Increases jewelry enchantment effectiveness by 60%.
PART OF THE OAKENSOUL RING SET (0/1 ITEMS)
(1 item) While equipped, you are unable to swap between your Primary and Backup Weapon Sets and gain Major Berserk, Major Courage, Major Brutality, Major Sorcery, Major Prophecy, Major Savagery, Major Force, Major Protection, Major Resolve, Minor Fortitude, Minor Intellect, Minor Endurance, and Major Heroism.
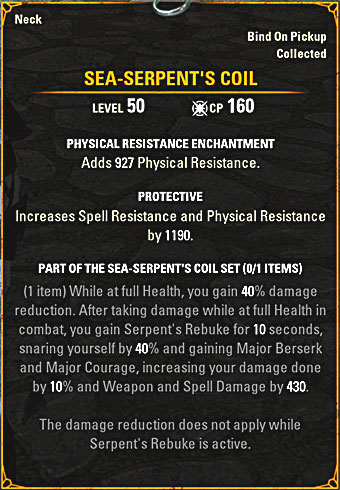
Sea-Serpent's Coil
Neck: PHYSICAL RESISTANCE ENCHANTMENT Adds 927 Physical Resistance. PROTECTIVE Increases Spell Resistance and Physical Resistance by 1190
PART OF THE SEA-SERPENT'S COIL SET (0/1 ITEMS)
(1 item) While at full Health, you gain 40% damage reduction. After taking damage while at full Health in combat, you gain Serpent's Rebuke for 10 seconds, snaring yourself by 40% and gaining Major Berserk and Major Courage, increasing your damage done by 10% and Weapon and Spell Damage by 430.
The damage reduction does not apply while Serpent's Rebuke is active.
Mythic Items in Galen and Y'ffelon
Stormweaver’s Cavort
Light Legs
Adds 300 Magicka Recovery. Sprint, Roll Dodge, Bash, Break Free, Sneak, and Block now consume Magicka instead of Stamina. You cannot regain Magicka while Blocking, Sneaking, or Sprinting. You can gain Stamina while Blocking, Sneaking, or Sprinting.
Faun’s Lark Cladding
Medium Chest
If you continuously Sprint for 1 second, you gain the ability to pass through enemies. Enemies you pass through become Charmed for 4 seconds, removing their ability to attack or cast abilities as they move toward you. Charming an enemy this way restores 678 Stamina and Magicka to you and heals you for 678 Health. Charming an enemy removes you from Stealth.
Syrabane’s Ward
Heavy Belt
You cannot move while Bracing. While Bracing, you create a 12 meter zone of protection. Allies within the zone increase their Block Mitigation by 30% and their Healthy Recovery by 950.
Necrom Mythic Items in Telvanni Peninsula and Apocrypha

Velothi Ur-Mage's Amulet
Neck: Adds 174 Weapon and Spell Damage. Adds 10 Magicka Recovery
PART OF THE VELOTHI UR-MAGE'S AMULET SET (0/1 ITEMS)
(1 item) Adds 1650 Offensive Penetration
(1 item) Increase your damage done to monsters by 15%, gain Minor Force at all times, increasing your Critical Damage done by 10%, and reduce your Light and Heavy Attack damage by 99%.
Among the followers of Veloth were counted mages and spellsmiths of unparalleled skill. Their vision of overwhelming arcane might is woven, lattice after lattice, into this talisman.

Esoteric Environment Greaves
Heavy Legs: Adds 954 Maximum Health.
PART OF THE ESOTERIC ENVIRONMENT GREAVES SET (0/1 ITEMS)
(1 item) While you are above 50% Stamina, reduce your direct damage taken by 50% and lose 968 Stamina whenever you take direct damage, up to once every 0.3 seconds.
The zeal of Dwemer researchers was legendary. Runes along the heel read: "Proof against magma, frost, ichor, poison, aetheric debris, necromancy, high pressure, claudication, temporal reallocation, and Daedric corruption."
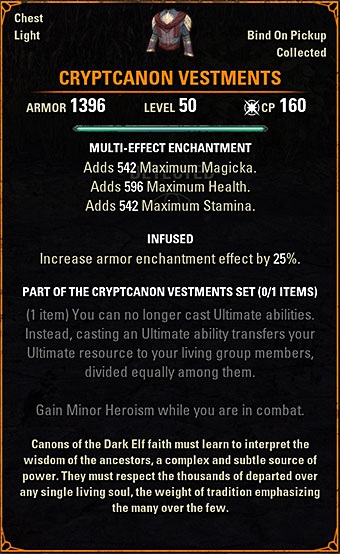
Cryptcanon Vestments
Light Chest: Adds 542 Maximum Magicka, Adds 596 Maximum Health, Adds 542 Maximum Stamina
PART OF THE CRYPTCANON VESTMENTS SET (0/1 ITEMS)
(1 item) You can no longer cast Ultimate abilities. Instead, casting an Ultimate ability transfers your Ultimate resource to your living group members, divided equally among them.
Gain Minor Heroism while you are in combat.
Canons of the Dark Elf faith must learn to interpret the wisdom of the ancestors, a complex and subtle source of power. They must respect the thousands of departed over any single living soul, the weight of tradition emphasizing the many over the few.
Necrom Antiques in Telvanni Peninsula and Apocrypha
Antique Map of Apocrypha Furnishing
Antique Map of the Telvanni Peninsula Furnishing
Apocrypha Fossil, Arch Furnishing
Apocrypha Fossil, Worm Furnishing
Mushroom Classification Book Furnishing
Vintage Necrom Votive Treasure
Apocrypha Fossil, Bones Large Furnishing
Apocrypha Fossil, Nautilus Furnishing
Ceremonial Chimer Krater Treasure
Cliff Strider Skeleton Stand Furnishing
Holy Velothi Chausable Treasure
Tribunal Window, Stained Glass Lighting
Apocryphal Well Furnishing
Music Box, Glyphic Secrets Furnishing, Pieces: 10
Spore Savant Body Marks Body Marking, Pieces: 7
Telvanni Alchemy Station Furnishing, Pieces: 10
Trifold Mirror of Alternatives Furnishing, Pieces: 3
Cryptcanon Vestments Chest, Pieces: 5
Esoteric Environment Greaves Legs, Pieces: 5
Velothi Ur-Mage's Amulet Neck, Pieces: 5