The Lighthouse 8 Map | Dragon Age: The Veilguard Maps
Dragon Age: The Veilguard Maps, The Lighthouse 8 Map in Fade for Chapter 8 with full walkthrough.
The Lighthouse 8 Map | Dragon Age: The Veilguard Maps

The Lighthouse 8 Map for Dragon Age: The Veilguard with Chapter 8 walkthrough, secrets and puzzles.

POI

Quest

Merchants

Exit/Entry

Not Available

Video

NPC

Enemy

Boss
Major Choices
Beacons

Mementos

Codex Entry

Notes

Interact

Loot

Chest

Potion

Zipline

Eluvian

Locked

Device

Crystal

Socket

Beam

Receiver
Walkthrough for The Lighthouse 8 Map
The Lighthouse 8 Map in Dragon Age: The Veilguard is located in Fade Region, in Chapter 8.
You're coming back to The Lighthouse 8 Map after you finish:
- "The Dragon Slayer" Story Quest in Rivain Coast Map and you recruit Taash Companion.
- "Where The Dead Must Go" Story Quest in Necropolis Halls Map and you recruit Emmrich Companion.
The Lighthouse 8 Map brings many new events in the story of Dragon Age Veilguard:
- Chapter 8 begins, the last part of Act 1;
- All Companions are now available: Harding, Neve, Bellara, Davrin, Taash, Lucanis and Emmrich;
- Lucanis is Hardened but he is back with team after Treviso fiasco;
- New "Shades of the Blight" Story Quest;
- New "Something Wrong" Story Quest;
- New Explorable Map Hossberg Wetlands;
Team Meeting
SHADES OF THE BLIGHT STORY QUEST
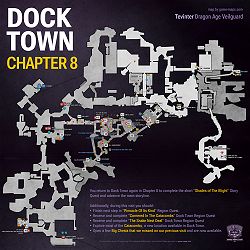
Dock Town - Meet Morrigan at the Cobbled Swan.
The team pursues leads that reveal disturbing information about the spread of the blight, but also gains some unexpected aid.
Elgar'nan and Ghilan'nain's forces are at work in many places. Fortunately, the team already has contacts who have begun pushing back. Lady Morrigan and Grey Wardens Antoine and Evka want to discuss their investigations into the gods and the blight.
Walkthrough
Shades Of The Blight Story Quest
Dock Town 8 Map - Meet Morrigan at the Cobbled Swan.
SOMETHING WRONG STORY QUEST
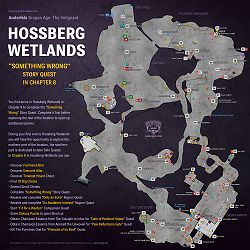
Hossberg Wetlands - Meet Evka and Antoine in the Hossberg Wetlands.
Wardens Evka and Antoine believe the blight has changed, but they need more proof to show the First Warden.
Rumors of a blight surge in the Hossberg Wetlands bring Evka and Antoine to a remote village. If there's proof the blight has changed, they'll find it here-but gathering evidence won't be pretty.
Walkthrough
Something Wrong Story Quest
Hossberg Wetlands Map - Meet Evka and Antoine in the Hossberg Wetlands.
Open Portal in Music Room
Place two Wisps near door inside Music Room.
One Wisp is in Music Room.
Second Wisp is outside, on balcony near two statues.
Second Wisp
Second Wisp for Music Room Portal.
Portal
Enter portal.
Library Balcony
Astrolabe
On Leaving the Lighthouse Codex Entry
Activate Astrolabe - discount in Workshop Upgrades.
Lucanis
Lucanis is back, but this time he doesn't want to talk to you.
Food Inventory Codex Entry in the dining room.
Neve
Neve doesn't have a new quest for you this time, but you can talk to her and romance her.
Neve's Case Notes: Good Word Codex Entry.
Bellara
Bellara is busy with her work.
Laboratory
Emmrich
Talk to Emmrich till you got quest.
RESTLESS SPIRITS REGION QUEST
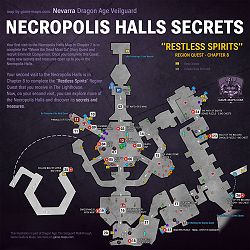
Necropolis Halls - Discover what's disturbing the wisps.
When something in the Necropolis Halls unsettles the local wisps, Emmrich asks for help discovering what's disturbed them.
Emmrich wishes to return to the Necropolis, to help some frightened wisps. Something down in the crypts must have disturbed them.
Walkthrough
Restless Spirits Region Quest
Necropolis Halls Secrets Map - Discover what's disturbing the wisps.
Varric
Varric has nothing interesting to say this time.
Storage Room
Taash
Taash is busy training and doesn't want to talk, but on the table you'll find a note that opens the next Quest.
FOR GOLD AND GLORY REGION QUEST
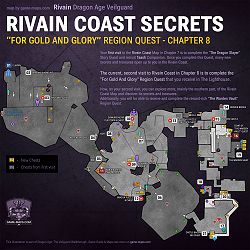
Rivain Coast - Recover the supplies.
The Lords of Fortune want to help the Crows fight the Antaam in Treviso, but the Antaam in Rivain have their own plans.
The Lords of Fortune have been helping the Crows of Treviso with supplies, but a supply drop has gone missing somewhere along the Rivain coast. Isabela has asked for assistance with tracking it down and, if necessary, helping the Crows.
Walkthrough
For Gold And Glory Region Quest
Rivain Coast Secrets Map - Recover the supplies.
Harding
Harding doesn't have a new quest for you this time, but you can talk to her and romance her.
Assan
You can pet Assan.
Davrin
Talk to Davrin.
HOW TO TRAIN A GRIFFON DAVRIN COMPANION QUEST
Arlathan Forest - Explore the forest.
Davrin wants to take Assan on an outing to stretch his wings.
Davrin is planning to take a restless Assan to Arlathan Forest, where he hopes that the young griffon can stretch his wings-and that griffon and Warden can get better acquainted.
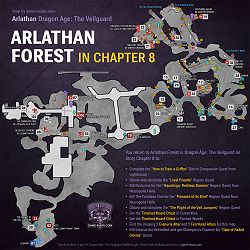
Walkthrough
How To Train a Griffon Davrin Companion Quest
Arlathan Forest 8 Map - Explore the forest.
Next two Story Quests: "Shades Of The Blight" and "Something Wrong" will move the plot of the entire story forward a lot, so before you do them, complete the Region and Companion Quests you already have.
Go to Necropolis Halls
Next Location
Necropolis Halls Secrets Map
Go to Necropolis Halls, finish "Restless Spirits" Region Quest, get new quests and check some secrets.
Go to Arlathan Forest Map
Next Location
Arlathan Forest 8 Map
Go to Arlathan Forest, finish "How To Train A Griffon" Davrin Companion Quest, get new quests and check some secrets.
Back in The Lighthouse
In the meantime, return to Lighthouse 8 for a moment and talk to Taash, first in the Library and then in his room, to collect two more quests.
FIRE ON THE SANDS TAASH COMPANION QUEST
Rivain Coast - Join Taash in Rivain.
Taash is taking some time on the beach to blow off steam, figuratively and literally. This quiet moment offers a chance to get to know her better.
Taash plans to head back to Rivain between quests and would welcome company.

Walkthrough
Fire On The Sands Taash Companion Quest
Rivain Coast: Lava Flows Map - Join Taash in Rivain.
"Fire On The Sands" is short quest, do it now.
Go with Taash to Rivain
Next Location
Rivain Coast: Lava Flows Map
Join Taash in Rivain for "Fire On The Sands" Taash Companion Quest.
Go with Taash to The Hall of Valor
Next Quest from The Lighthouse will lead you to a new location in Rivain, The Hall of Valor.
THE HALL OF VALOR REGION QUEST
The Hall of Valor - Explore the Hall of Valor.
The Hall of Valor in Rivain offers fighters a chance to test their skills against spirits.
The Hall of Valor, a training area in Rivain run by the Lords of Fortune and friendly Spirits of Valor, offers fighters the chance to test their prowess and win bragging rights.
Walkthrough
The Hall of Valor Region Quest
Hall of Valor Map - TExplore the Hall of Valor.
Next Location
Hall of Valor Map
Travel to Hall of Valor with Taash for "The Hall of Valor" Region Quest.
Back to Main Story
Library
You return from Dock Town with "A Change On The Wind" Story Quest.
A CHANGE ON THE WIND STORY QUEST
Lighthouse - Return to the Lighthouse - Check in with the team.
Rumors reach the team of a new darkspawn threat.
After learning of mounting danger from the Inquisitor and being warned by the First Warden not to interfere with Grey Warden business, the team hears rumors of a darkspawn threat approaching Weisshaupt.
Talk to Davrin to get next Story Quest.
COMPLETED A CHANGE ON THE WIND STORY QUEST
THE SIEGE OF WEISSHAUPT STORY QUEST
Lighthouse - Prepare for Weisshaupt - Talk to Solas.
After receiving word that the gods are marching towards Weisshaupt, the team must seize the opportunity to destroy them.
Elgar'nan and Ghilan'nain are marching their darkspawn army toward Weisshaupt, which gives the team an opportunity to destroy them.
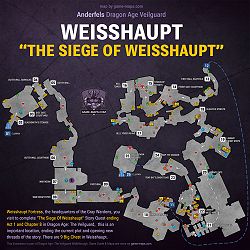
Walkthrough
The Siege Of Weisshaupt Story Quest
Weisshaupt Map - After talk to Solas in The Lighthouse find Antoine and Evka in Weisshaupt.
Leave this Quest for now and finish other things you can do in Lighthouse 8.
Finishing Regrets Of The Dread Wolf
REGRETS OF THE DREAD WOLF REGION QUEST
Lighthouse - Investigate the wolf statuette - Find a way to use the wolf statuette in the Lighthouse.
Magical artifacts offer the team a chance to learn more about the history of the ancient elves... and their secrets.
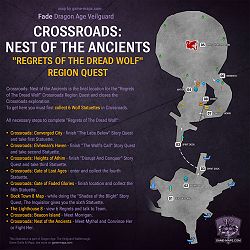
Walkthrough
Regrets Of The Dread Wolf Region Quest
Crossroads: Nest of the Ancients Map - Look for more wolf statuettes in Crossroads.
View Regret
For "Regrets of The Dread Wolf" Region Quest - Place wolf statuette and talk to Team (do it 6 times).
Go meet Morrigan in Crossroads: Beacon Island.
Next Location
Crossroads: Nest of the Ancients
Go meet Morrigan in Crossroads: Nest of the Ancients to open Crossroads: Nest of the Ancients for Regrets of The Dread Wolf" Region Quest.
Back from Crossroads: Nest of the Ancients
Meditation Room
Talk to Solas for "The Siege Of Weisshaupt" Story Quest.
Emmrich
Talk to Emmrich.
WALKING THE GRAVES EMMRICH COMPANION QUEST
Necropolis Halls - Perform rites with Emmrich.
As Emmrich performs rituals to honor the dead of the Grand Necropolis, the senior necromancer opens up about his past.
Despair demons have been banished from the lower Necropolis, but the depths call once again to Emmrich. The senior necromancer is duty bound to return home and perform sacred rites of remembrance for the dead.

Walkthrough
Walking The Graves Emmrich Companion Quest
Necropolis Halls: Memorial Gardens - Perform rites with Emmrich.
Taash
Talk to Taash.
DRAGON CLASS TAASH COMPANION QUEST
The Hall of Valor - Spend time with Taash.
A visit to the Lords of Fortune bar lets Taash show off her dragon knowledge.
Taash is meeting friends at the Hilt, the bar the Lords of Fortune use as their base of operations. The casual visit offers a chance to get to know Taash better.
Walkthrough
Dragon Class Taash Companion Quest
The Hall of Valor Map [14] - Spend time with Taash - Meet Taash at the Hilt.
Harding
Talk to Harding.
THE WAITING STONE HARDING COMPANION QUEST
Deep Roads - Help Harding contact Kal-Sharok.
Harding travels to the domain of the dwarves to search for a mysterious figure who may have answers about her new abilities.
Seeking answers about her new abilities, Harding has contacted the Kal-Sharok dwarves with hope that they'll know whose voice she's been hearing.
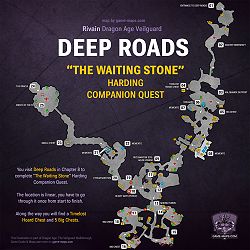
Walkthrough
The Waiting Stone Harding Companion Quest
Deep Roads Map - Deep Roads - Help Harding contact Kal-Sharok.
Next Location
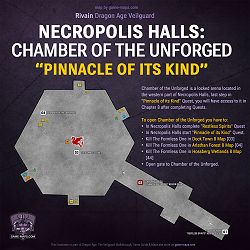
Necropolis Halls: Chamber of the Unforged
Next go to Necropolis Halls: Chamber of the Unforged to finish "Pinnacle Of Its Kind" Region Quest.
Next Location
Necropolis Halls: Memorial Gardens
Next go to Necropolis Halls: Memorial Gardens to finish "Walking The Graves" Emmrich Companion Quest.
Next Location
The Hall of Valor Map
Next go to and finish short "Dragon Class" Taash Companion Quest.
Next Location
Deep Roads Map
Next go to Deep Roads and finish "The Waiting Stone" Harding Companion Quest.
After return from Deep Roads
Talk to Harding
COMPLETED THE WAITING STONE HARDING COMPANION QUEST
Stalgard brought Harding to the mysterious Oracle, who also has a connection to the Titans, the predecessors of the dwarves. However, the meeting was interrupted by a sinister force the Oracle believes now hunts Harding.
Now is time to advance in Story
Next Location
Weisshaupt Map
After talk to Solas in The Lighthouse, travel to Weisshaupt to find Antoine and Evka for "The Siege Of Weisshaupt" Story Quest.
Dragon Age: The Veilguard Map Legend
POI
Point of interest, location, numbered reference on the map to the description below. The order of the numbers is the suggested order of visiting.
Quest
Quest Starter, location where the some Quest begins. Story Quests, Region Quests.
Merchants
In the merchants you can buy and sell, equipment and among other things, items that are Mementos.
Exit/Entry
Entering or exiting another map, area or zone.
Not Available
This location is unavailable in this Chapter, you will gain access here later in the Story.
Video
There is Video Walkthrough for this location.
NPC
Friendly NPC or Companion, able to interact.
Enemy
Group or a single aggressive enemy.
Boss
Boss or strong enemy.
Major Choices
There are many choices with consequences you have to make in Dragon Age Veilguard, some of them are simply more important then other.
Beacons
Fast Travel points in Veilguard. To unlock a Beacon you must first visit it, once you unlock it you can Fast Travel to that location from the in-game map. Beacons in Veilguard are also used to organize Companions in your party.
Mementos
Important magic collectible items, you can find them or buy from merchants in Veilguard. Mementos are used for upgrading Caretaker's Workshop in Lighthouse. There are 182 Mementos in Veilguard.
Codex Entry
Library Update
Notes
Notes, plaques.
Interact
Interaction is possible here.
Loot
Small loot, a bags of currency, small chests, to be picked up, box of raw materials.
Chest
Large Chests with contain weapons, armor and equipment
Potion
Healing Potion leczy cię lub zostanie dodana do ekwipunku.
Zipline
You can slide down the zipline.
Eluvian
The Eluvian Gate, when properly positioned, allows for long-distance travel.
Locked
Locked and can be unlocked. Some locations or doors open over time as the story progresses, some must be opened by solving puzzles or using a key.
Device
Elven Device - Bellara can activate or deactivate it, Resonance Amplifier.
Crystal
Elven Power Crystals - you can insert it into Socket
Socket
Socket for Elven Power Crystals
Beam
Magical Beam is an Elven Device that sends a beam of energy to the Receiver, energizing it and turning it on.
Receiver
Magical Beam Receiver is an Elven Device that can be activated by a Magical Beam when an energy beam hits it.