Borderwatch Outpost and Melve Map for Dragon's Dogma 2
Map of Borderwatch Outpost and Melve locations in Dragon's Dogma 2 with Walkthrough and map locations of Riftstones, Seeker's Tokens, Golden Trove Beetles, Treasure Chests, Main and Side Quests, Caves and Dungeons, Portcrystals, Oxcart Stations, Inns, Shops, NPCs, Campsites, Secrets, Fast Travel Locations, Collectibles, Dragon's Dogma 2 Maps with Walkthrough.
Map of Borderwatch Outpost and Melve in Dragon's Dogma 2
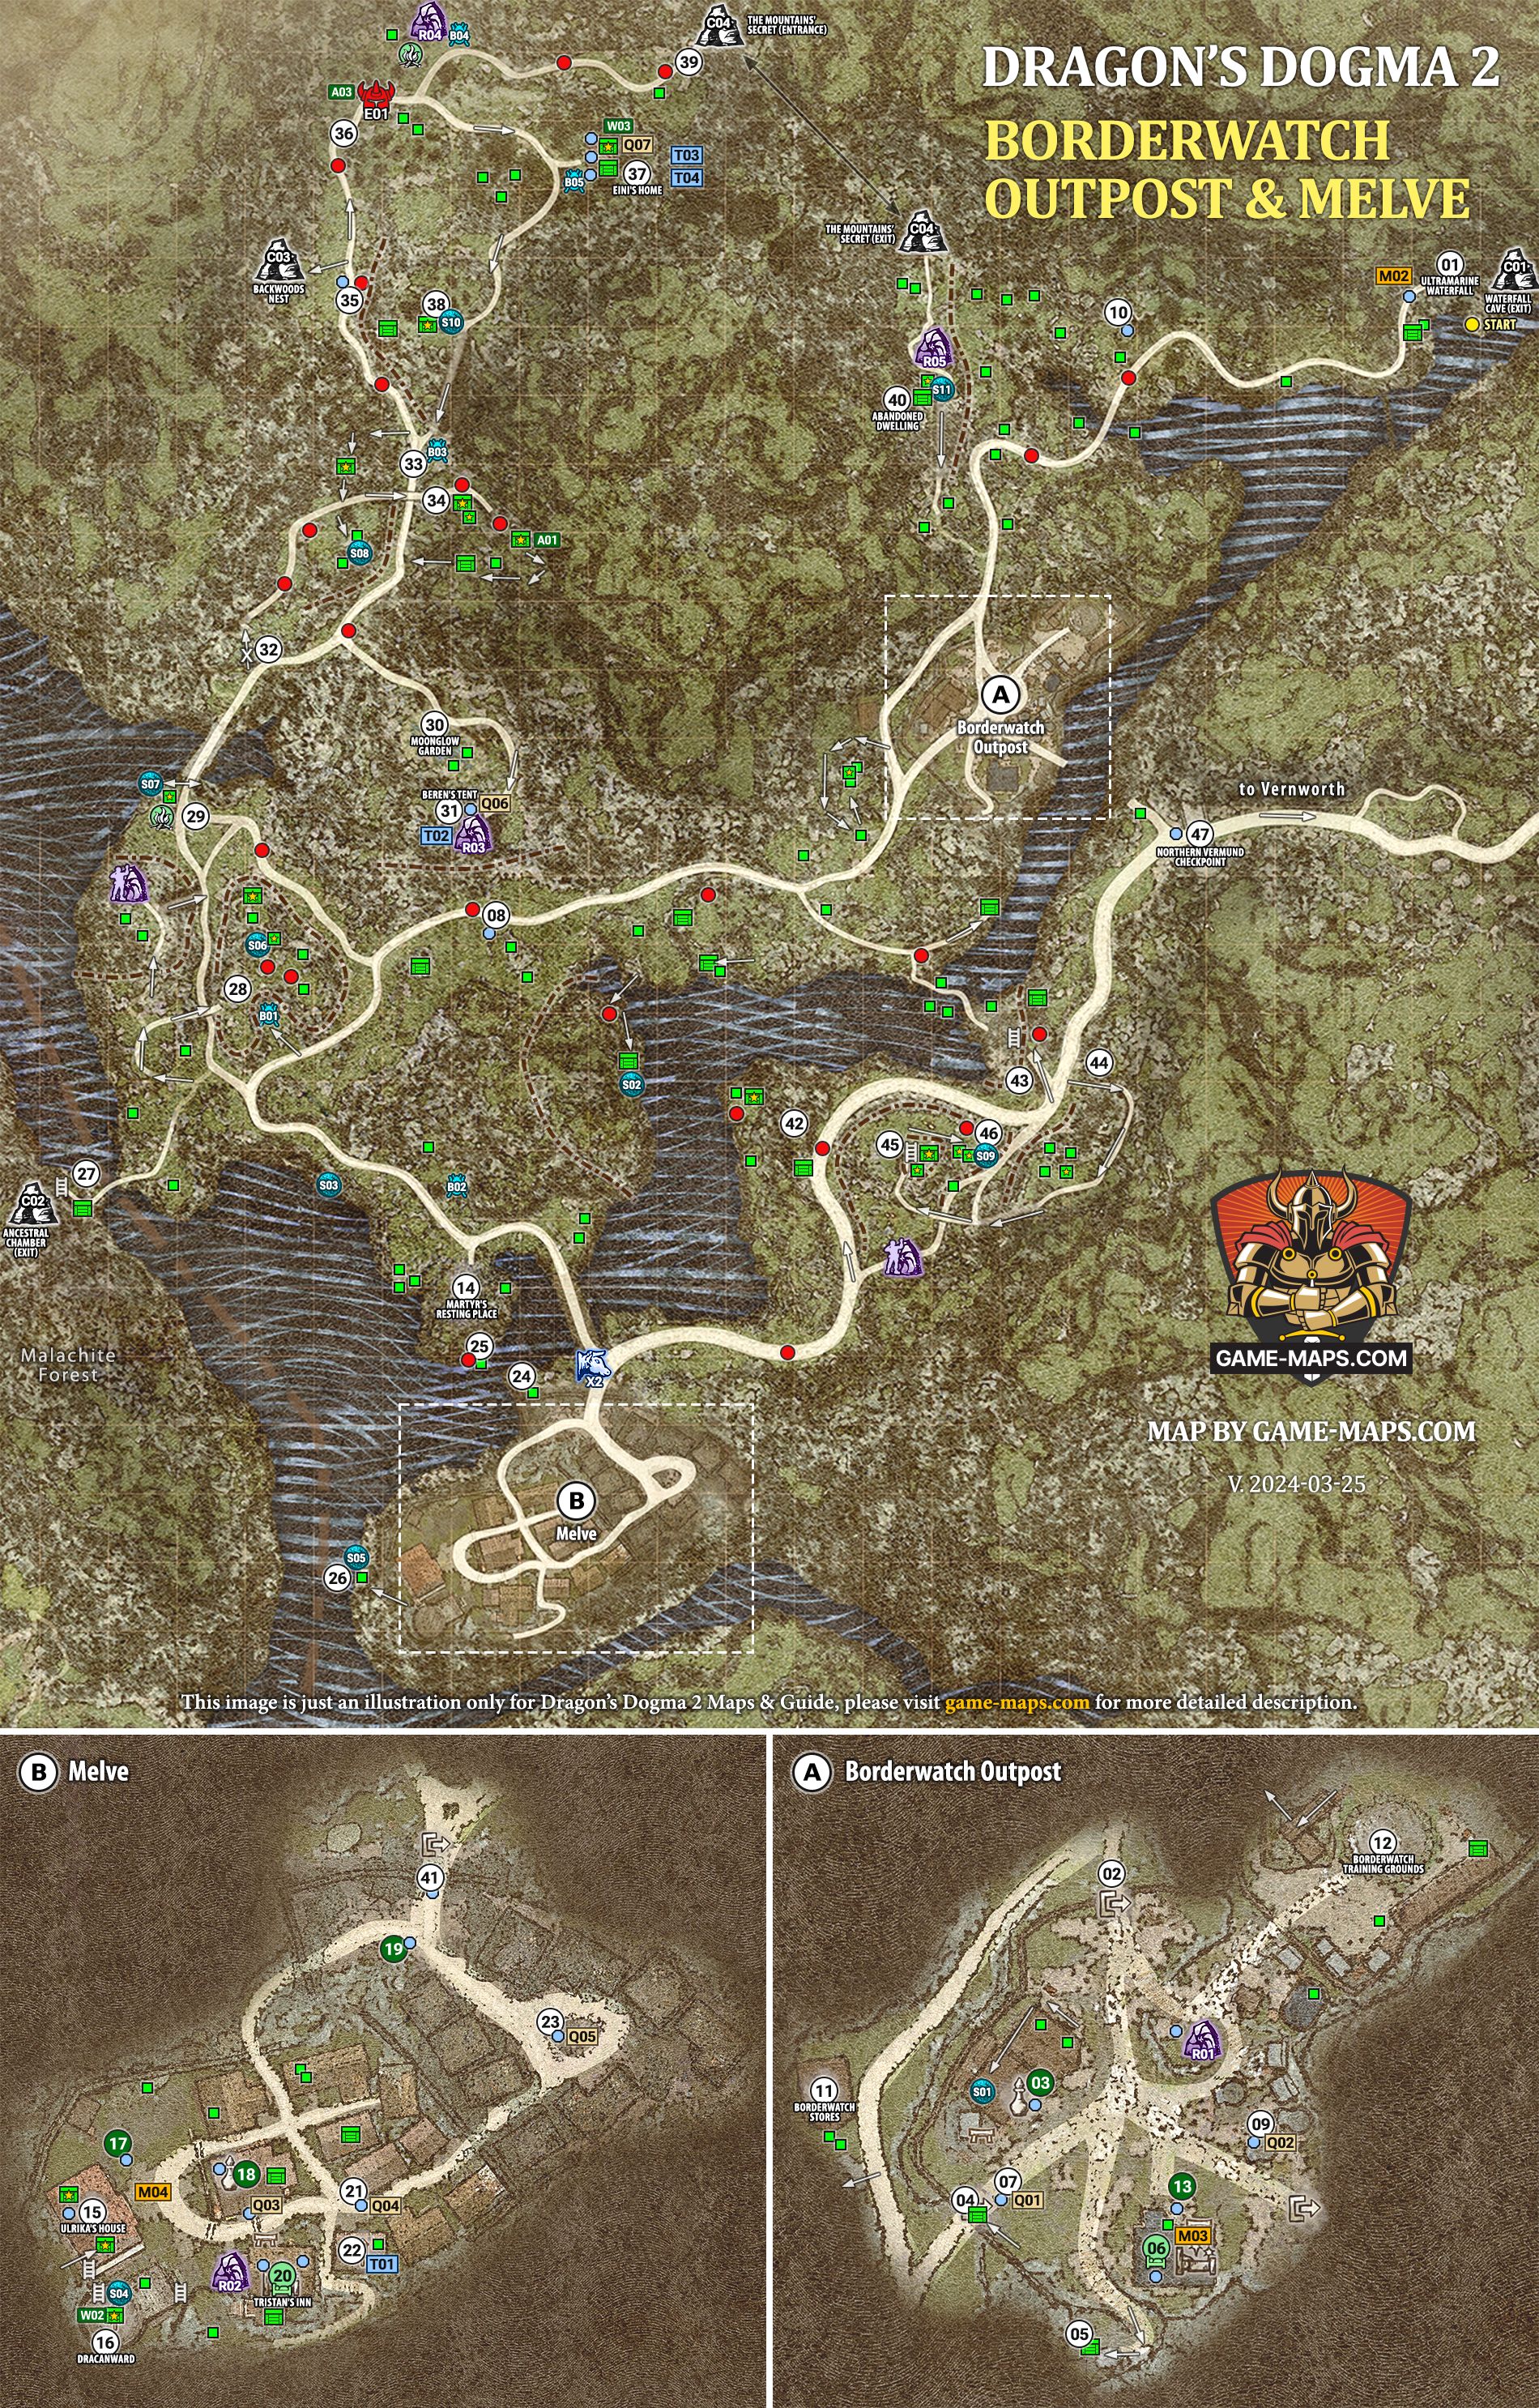

Borderwatch Outpost and Melve Town are located in northern Vermund, you get here after the end of the Prologue, flying to Griffin from the Excavation Site Gaol.
Dragon's Dogma 2 Map of Borderwatch Outpost and Melve Town shows locations on map of Main and Side Quests, Riftstones, Seeker's Tokens, Golden Trove Beetles, Treasure Chests, Caves and Dungeons, Portcrystals, Oxcart Stations, Inns, Shops, NPCs, Campsites, Secrets, Fast Travel Locations, Collectibles.
Previous Dragon's Dogma 2 Map: Prologue: Excavation Site Gaol Map.
Additional maps:
Borderwatch Outpost Walkthrough for Dragon's Dogma 2 Map
You reach this location for the first time after completing the Prologue to Dragon's Dogma 2, after flying on Griffin's wings from Excavation Site Gaol. You wake up from unconsciousness and see your companion dying without any possibility of rescue, being dragged underwater by Brine.
Waterfall Cave (Exit)
This is one of the two possible entrances to Waterfall Cave (Dungeon), it is now blocked by Griffin's body and you cannot enter. You will return here later in the story.
Ultramarine Waterfall
Talk to Justinn.
Tale's Beginning Main Quest
Starting Location: Near Ultramarine Waterfall.
Quest Giver: Justinn.
You gained your freedom and crossed the sea on griffin wing, only to have your pawn companion swallowed up by the Brine. Now alone, you must seek aid and information.
Follow Justinn to Borderwatch Outpost [A]. Open the chest and pick up any other items you find on the ground along the way.
Salubrious Draught.
Along the way, you will have to fight Goblins twice.
Borderwatch Outpost
Borderwatch Outpost (Northern Watch Encampment) is the first settlement you come to in Dragon's Dogma 2.
Pawns welcome you at Nothern Gate
When you enter the Borderwatch Outpost for the first time, you are greeted at the gate by a group of Pawns, servants of Arisen who want and will help you in your travels.
More about Pawns in Dragon's Dogma 2
They lead you to the first Riftstone (R01) where you can summon your Main Pawn and two Support Pawns.
Borderwatch Riftstone
Talk to Luksa about Pawns and Riftstones, summon your Main Pawn and two Support Pawns.
Borderwatch Commissary - General Store
Kassandra sells wide range of starting equipment and weapons.
Seeker's Token on the roof.
South Gate Tower
Fulgurous Lord (Grimoire) inside tower, you have to jump from SE.
Watch Tower
Aged Scrag of Beast underneath the tower.
Borderwatch Lounge Inn
- Place to Rest
- Place to Save Game
- Personal Storage
- Combine Items
- Vocation Guild
Warrick on your first visit, you will be allowed to sleep overnight for free.
Important: Saving your game in Dragon's Dogma 2
Saving game progress in Dragon's Dogma 2 looks different than in most games you know. There are only two slots for saving your game:
- First Slot is Last Save, this save performed automatically in selected places or you can do it manualy by saving game yoursefl. Automatic Save will always owerwrite Last Save. So when you loading game from Last Save you will always get the latest, safe game state.
- Second Slot: A Last Inn Rest Save, its made automatically when you rest in Inn. It is overwritten only when you rest in Inn again. It is not overwritten by the game prograss, it is always your last rest at the Inn. So if you want to save the game in a specific place, then go on an expedition, and then go back in time to the moment of sleep in the Inn, this is the option.
So if you want to go back to an earlier point in the game, you only have one saved game left, your Last Inn Rest, so make it carefully.
Now go to sleep at the Inn.
In Dragon's Wake Main Quest
Starting Location: Borderwatch Lounge Inn.
Quest Giver: Warrick after you sleep..
As the Arisen, you bear a deep connection to the dragon. Having heard that Melve was ravaged by its attack, you make for the village in the hope of regaining your lost memories.
Phill
After you sleep in Borderwatch Lounge Inn and start Dragon's Wake Main Quest you can meet Phill near South Gate, he will give you Side Quest.
Ordeals of a New Recruit Side Quest
Prerequisites: Finish "Tale's Beginning" Main Quest.
Starting Location: Near South Gate in Borderwatch.
Quest Giver: Phill.
Time Limited: Yes.
Quest Reward: 1000G, Lantren Oil.
To a monster, new recruits are simply easy pickings. As such, sending an untrained soldier into the heart of a harpy flock was probably not the wisest choice.
Accardo
Accardo for "Ordeals of a New Recruit" Side Quest.
Geoffrey
Geoffrey talk to him for next Side Quest.
The Provisioner's Plight Side Quest
Prerequisites: Finish "Tale's Beginning" Main Quest.
Starting Location: West side of Borderwatch.
Quest Giver: Geoffrey.
Time Limited: Yes
Quest Reward: 900G.
Oft what matters is that the work gets done, not the hands that do it. When saddled with another's task, you can but hope that the trust you earn will make it worth the effort.
Markus
Markus for "The Provisioner's Plight Side Quest" Side Quest.
Borderwatch Stores
Pick Harspuds for "The Provisioner's Plight Side Quest" Side Quest.
Borderwatch Training Grounds
Walking Powder.
Montgomery (Merchant)
Montgomery sells wide range of starting equipment and weapons.
Now head towards Melve [B] to continue the Dragon's Wake Main Quest, collecting everything along the way.
Seeker's Token - you have to jump from cliff to cliff.
Golden Trove Beetle.
Seeker's Token - get off the road lower to the coast.
Golden Trove Beetle.
Martyr's Resting Place
Melve Oxcart Station
Melve Oxcart Station is currently unavailable, this Oxcart route will be restored later in the story. More on Oxcart Stations in Dragon's Dogma 2.
Later in game, after you visit Vernworth, and got "Oxcart Courier" Side Quest from Donovan, return to Melve and talk to Lennart to open Melve Oxcart Station.
Melve Walkthrough for Dragon's Dogma 2 Map
Melve Town
Melve is Stronghold Razed by Dragon's Fire located in Northern Vermund. You arrive in Melve to continue "Dragon's Wake Main Quest", enter the city and head to the burnt part of Melve, to the square with a well, to see your vision.
Ulrika wakes you up from fainting caused by visions of the past, talk to her. Your conversation will be interrupted by guests, you go outside in front of Ulrika's House in Melve.
Gregor is waiting for you in front of Ulrika's House, who informs you that you must go with him to the capital of Vermund, and that you must first talk to Ser Lennart (for "Dragon's Wake Main Quest").
From then on, Gregor will be waiting for you at the entrance to Melve to take you to Vernworth. If you agree to the journey, the story of Dragon's Dogma 2 will start moving forward. But don't do it too quickly, finish exploring the area around Melve and the northern part of Vermund first.
Due to the journey, you receive another Main Quest: "Seat of the Sovran", but do not complete it for now.
Seat of the Sovran Main Quest
Prerequisites: Come to Melve and talk to Gregor
Starting Location: Near Ulrika's House in Melve during first visit in Melve.
Quest Giver: Gregor.
Make your way into capital and affirm your identity as the Arisen.
You have arrived in Vernworth, capital of Vermund and seat of its Sovran. As the Arisen, it would seem that throne is yours to claim by right. Is this where your destiny begins?
Ulrika's House
Ulrika
Wakestone Shard on ground level inside.
Grimoires: Fulgurous Lord, Winter's Path, Threshing Blaze the chest is on the ruined roof, you can get there via the ladder at the back of the house.
Dracanward
Fluted Bow Weapon in chest on second floor inside Dracanward in Melve.
Seeker's Token at the top of Dracanward in Melve.
Mia (Merchant)
Mia sells wide range of food and equipment.
Melve Riftstone
Runne's Apothecary - General Store
Flora stands in front of the entrance to Runne's Apothecary and has a task for you..
Medicament Predicament Side Quest
Prerequisites: After first arriving at Melve.
Starting Location: in front of Runne's Apothecary in Melve.
Quest Giver: Flora.
Time Limited: No.
Quest Reward: 100G and Ring of Exultation.
Deliver Fruit Roborant
A merchant is no less than the sum of their wares. This simple truth is not lost on young Flora, who ventured out from Vernworth to procure a medicament sold only in Melve.
You can buy Fruit Roborant for Flora, combine it or find it in a chest in (34).
After you finish this Side Quest, meet Flora in Vernworth for Chirurgeon's Tome as additional reward.
Runne sells wide range of equipment and weapons.
Dudley (Merchant)
Dudley sells wide range of starting equipment.
Tristan's Inn
Lennart for "Dragon's Wake Main Quest", talk to him about Vocations.
Ian
Ian, talk to him for next Side Quest.
Brothers Brave and Timid Side Quest
Prerequisites: After first arriving at Melve.
Starting Location: Near Lennart's House in Melve.
Quest Giver: Ian.
Time Limited: No.
Quest Reward: 1500G, Homespun Cloak.
Norbert ventured into the forest to collect medicinal herbs, sorely needed in Melve in the wake of the dragon’s fury. But he has yet to return, and his brother, Ian, is very worried.
Lennart's House
Lennart - Fighter Maister
Fighter Vocation Trainer.
Lennart
Lennart, after you talk to him in Tristan's Inn. talk to him for next Side Quest.
Nesting Troubles Side Quest
Prerequisites: Talk to Lennart in Tristan's Inn in Melve.
Starting Location: Square with a well in Melve.
Quest Giver: Lennart.
Time Limited: No.
Quest Reward: 1250G, Stoutness Extract.
Throw explosive casks into the Saurian Nest.
Melve's defenses are greatly diminished in the wake of the dragon’s attack, making the village a target for all manner of opportunistic monsters.
Throw explosive casks
Pick up the explosive casks (they are near on the ground) and throw them at the Saurian Nest (25) for the "Nesting Troubles" Side Quest, till you kill them, then return to Lennart.
Return and throw a jar of poison (it lays near on the ground) into Saurian Nest (25). Talk to Lennart to finish quest.
Saurian Nest
For "Nesting Troubles" Side Quest.
Seeker's Token
Seeker's Token go to western part of Melve, and go down to the beach behind Ulrika's House house.
We're basically done exploring Melve for now, now it's time to explore the rest of the Northern Vermund area.
Exploring Northern Vermund
Before we continue to Vernworth, the capital of Vermund for "Dragon's Wake Main Quest", it is worth completing the exploration of Northern Vermund.
Go to (27) in most western part of this map.
Bridge and Ladder
At the top you see a rolled up ladder, but you can only unfold it from the other side. You'll do it later.
Mundane Camping Kit
Ancestral Chamber (Exit)
Up on the cliff you see the exit from the Ancestral Chamber Dungeon. You can't enter from this side until you lower the ladder from the other side. We'll come back there later in the game's story.
Plateau with Goblins and Harpies
Enter the plateau through the side entrance (don't go under the rock bridge, just go left and up in an arc to the right). Here you will face your first serious fight, but also a lot of loot.
Seeker's Token in harpy nest on the top.
Campsite
This is the first Campsite you have found. Next to it is the Modest Camping Kit, which allows you to spend the night here. If you don't know it yet, traveling at night is very dangerous. Don't go to sleep now, leave this Camping Kit for the evening. If you don't manage to get back from your trip before nightfall, come back to this Camsite and sleep here safely.
Seeker's Token in harpy nest on the top.
Moonglow Garden
Beren's Tent
Bren talk to him for next Side Quest.
Claw Them Into Shape Side Quest
Prerequisites: After Tale’s Beginning Main Quest.
Starting Location: Near Moonglow Garden.
Quest Giver: Beren.
Time Limited: No.
Quest Reward: 4,500 G.
You encountered Beren, a beastren training recruits at the encampment by the border. Though he is a warrior of skill, his presence seems to be discouraging new enlistments.
Find Beren a motivated soldier to train and procure thre swords.
You can find sword in chests or you can buy them, but finding soldier have to wait till you start to move to Vernworth, later in game.
Talk to Humphrey in Vernworth City (07) and recruit him.
Beren - Warrior Maister
Warrior Vocation Trainer.
Riftstone of the Summit
Side Path to Left
Take main road to the right, becouse an ambush is waiting for you on the left.
Crossroads
Golden Trove Beetle.
At the intersection you cannot go to the right. The main road goes NW to the left, but you take the side path up to the W.
Panacea
Slide down to road with bridge.
Seeker's Token.
Cross the Bridges
Wakestone Shard
Fruit Roborant for "Medicament Predicament" Side Quest.
Hide Cap
Hide Cap Armor in the chest.
Norbert
Norbert for "Brothers Brave and Timid" Side Quest, save him and return to Melve for finishing quest.
Return to Melve now to finish quest, go to sleep until morning in Inn and come back here.
Backwoods Nest Cave
Backwoods Nest Map this is an easy and small cave you can explore right away.
Behind the bend is the first Boss
He's not particularly strong, but he's always a Boss with a lot of health. Maybe save your game.
Cyclops - Boss
- Wizard's Hat (Head) for Mage.
- Misshapen Eye
- Rugged Bone
Riftstone of Abundance
Campsite
Golden Trove Beetle.
Eini's Home
Trysha talk to her with Eini in room, then talk to her again bit later with no Eini or Eino near.
Eini talk to her.
Eino talk to him.
Ironclad Staff (Mage) inside chest.
Spellbound Side Quest
Prerequisites: Talk to Trysha with Eini in room, then talk to her again bit later with no Eini or Eino near.
Starting Location: Eini's House.
Quest Giver: Trysha.
Time Limited: Yes.
Quest Reward: 3000 G, Cast Stone, Conjurer's Jottings, Enchanter's Almanac.
You encountered Trysha, a young girl living with her grandparents on the outskirts of Vermund. Fed up with her dreary days, she dreams of only one thing: studying magick.
Trysha wants five Grimoires:
- Fulminous Shield
- Howling Blizzard
- Nation's Death Knell
- Towering Earth
- Let There Be Light
Don't give her the 5 Grimoires until you manage to make a copy of them, because you will need the same 5 Grimoires for another task.
Eini - Mage Maister
Mage Vocation Trainer.
Trysha - Sorcerer Maister
Sorcerer Vocation Trainer (one of two).
Golden Trove Beetle near Eini's Home.
Eini
Eini talk to her.
Wakestone Shard near statue.
Seeker's Token.
Enter The Mountains' Secret
Enter The Mountains' Secret and move to other end of cave.
The Mountains' Secret Cave
The Mountains' Secret Map this is an easy cave you can explore right away.
Exit from the other side of the cave.
Abandoned Dwelling
Jasper inside hut.
Seeker's Token inside hut.
Riftstone of Potential
Return to Melve and talk to Gregor (41) for "Dragon's Wake" Main Quest
Traveling to Vernworth with Gregor
At this point, we've basically explored everything possible in Northern Vermund, so it's time to move on in the story and finish the "Dragon's Wake" Main Quest with Gregor.
Gregor wants to take you to the Capital
Gregor wants to take you to Vernworth, capital of Vermund for "Dragon's Wake" Main Quest. Don't agree by telling him "I need time" until you've explored the rest of the area.
If you are ready tell Gregor "I'm ready now" and follow him.
Kill enemies, open chests and pick loot.
Wakestone Shard
Ladder
Kill the Goblins and lower the ladder down.
Blocked passage
Break the stones and enter the corridor.
Hole with Goblins
Wakestone Shard
Tooth and Seeker's Token
Putrid Gold Tooth on the ground.
Ring of Cooling on the ground.
Seeker's Token in chest.
Northern Vermund Checkpoint
Guard Stanley informs you that the gate is closed. In practice, this means that you will be able to go through it together with Gregor during the continuation of "Dragon's Wake" Main Quest. So return to Gregor in Melve and, if you are ready, go with him on a journey to Vernworth.
If you are with Gregor just go through the gate.
Next Map is East Vermund Map.
Dragon's Dogma 2 Map Markings

Locations
Landmarks, Points of Interest, Settlements, Waypoints and Interesting Locations.
You should visit all these locations, the suggested order is consistent with the numbers, but not obligatory.

Shops and Services
You can Buy or Sell items like weapons, armor, consumables and other.
By making friends with a seller in a store or by shopping there frequently, you have a chance to receive rare items and expand the available assortment.

Inns
Staying at an inn fully restores your party's Health and Stamina. It also recovers the loss gauge, which represents a reduction in your Health and accumulates when taking damage.
At Inns you have access to your personal Storage, same Storage can be accessed in any Inn. All stored items will be kept fresh as long as they are in Storage.
The Inn also serves as a Vocation Guild in smaller towns, to manage your Vocations (Character Class).
When resting at an inn, you can choose whether to rise in the morning or at night-useful if you need to set out at a particular time. Foresighted adventurers will stay at inns regularly, to avoid risks when traveling far afield.

Campsites
A place out of towns, to rest for your Party. If you have a Camping Kit you can regenerate here like in a regular Inn. Before you start resting, eliminate all enemies in the area to avoid being attacked while you sleep

Cave and Dungeon Entrances
Small Dungeons, usually underground, with items and valuables guarded by monsters.
There is often more than one entrance to a Dungeon.

Portcrystals
Fast Travel Teleporters in Dragon’s Dogma 2, use Ferrystone to teleport to any other previously discovered Portcrystal.
Fast Travel is not popular in Dragon's Dogma 2, which is why you will only find a few Portcrystals.
"A Trial of Archery" Side Quest in Sacred Arbor you will be able to get your own Portcrystal as an item. You can also buy it later in-game.

Oxcart Stations
You can Fast Travel from Oxcart Station by Oxcart.

Riftstones (Regular Riftstones)
Riftstones available in Towns and important locations. Their function is to summon Support Pawns. You summon Pawns at an experience level similar to your own. Different Riftstones have the ability to select Pawns with specific properties.
You can try to rebuild the Forgotten Riftstone and if you succeed, a new Regular Riftstone will be created.

Forgotten Riftstones (Free Pawn)
Destroyed Riftstones scattered around the land that you can rebuild. When you try to rebuild Forgotten Riftstone, two things can happen (they are not random, but assigned to a specific place):
- Riftstone will be restored - then it will turn into a Regular Riftstone with a specific feature assigned to the summoned Pawns in it.
- It will be permanently destroyed - and one time will summon a random high-level Pawn that you can recruit for free. And this is exactly this type of Riftstone.

Main Quests
The starting location for Main Quests, which are part of the game's plot and create the storyline.
There are 16 Main Quests in Dragon's Dogma 2 and it's hard to miss another one as the end of one begins the next. By following the numbering order of Main Quests, you can see where the game's plot will take you next. Completing the storyline, i.e. completing all Main Quests, will take you about 30 hours.

Side Quests
Starting locations for Side Quests, which are additional tasks you can perform in the world of Dragon's Dogma 2. These are separate closed stories.
In the game with over 50 Side Quests, completing them will take you twice as much time as the main story. Completing Side Quests is not necessary to complete the game, but it can often make it much easier.

Chests
Chests in Dragon's Dogma 2 differ visually, the more solid and ornate the chest looks, the more valuable content you can expect.

Golden Trove Beetles
Rare beetles that shine like gold. Their consumption permanently increases your carrying capacity by 0.15 kg. The Arisen’s main pawn can also receive the same effect.
There are at least several dozen Golden Trove Beetles in Dragon’s Dogma 2.

Seeker's Tokens
There are over 240 Seeker Tokens in Dragon's Dogma 2, they are Collectibles and also a currency that you can use in Guild Halls for special rewards.

Interactive friendly NPC
There are many NPCs in Dragon's Dogma 2, but only some of them can engage in conversations with you.

Maister NPC - Vocation Trainer
Advanced and Hybrid Vocations need to be unlocked by Trainers (Maisters).

Locations of interesting Weapons

Locations of interesting Armors

Items and Loot

Ore Veins

Enemy Bosses
A strong opponent with lots of health and special attacks.

Enemies
A group of enemies on a normal level.
Vocation Guild
Learn new Vocations or change Skills.

Taverns

Oracles
It predicts the future and suggests what to do next.
Mortuary
Using Wakestones can revive dead NPCs .

Bordelrie

Scrap Store
Scrap Store can duplicate items.
Bench
Sit to pass time.