Hernand in Chapter 2 - Crimson Desert Map
Crimson Desert Map with walkthrough and guide for Hernand in Chapter 2 Golden Greed, Crimson Desert Maps.
Crimson Desert Map: Hernand in Chapter 2


The end of Chapter 1: The First Encounter takes you from Abyss: Ethereal Pathway back to Hernand Town. This is where Chapter 2: Golden Greed kicks off, centered around the town and its outskirts.
We will focus on pushing through the main story for Chapter 2 first. You'll pick up some new skills and take down two bosses before we dive into a full sweep of Hernand Town and its outskirts. After that, we’ll clean up the side quests and explore the surrounding areas.
Hernand Maps Crimson Desert

Hernand Town in Chapter 1
Hernand in Chapter 2
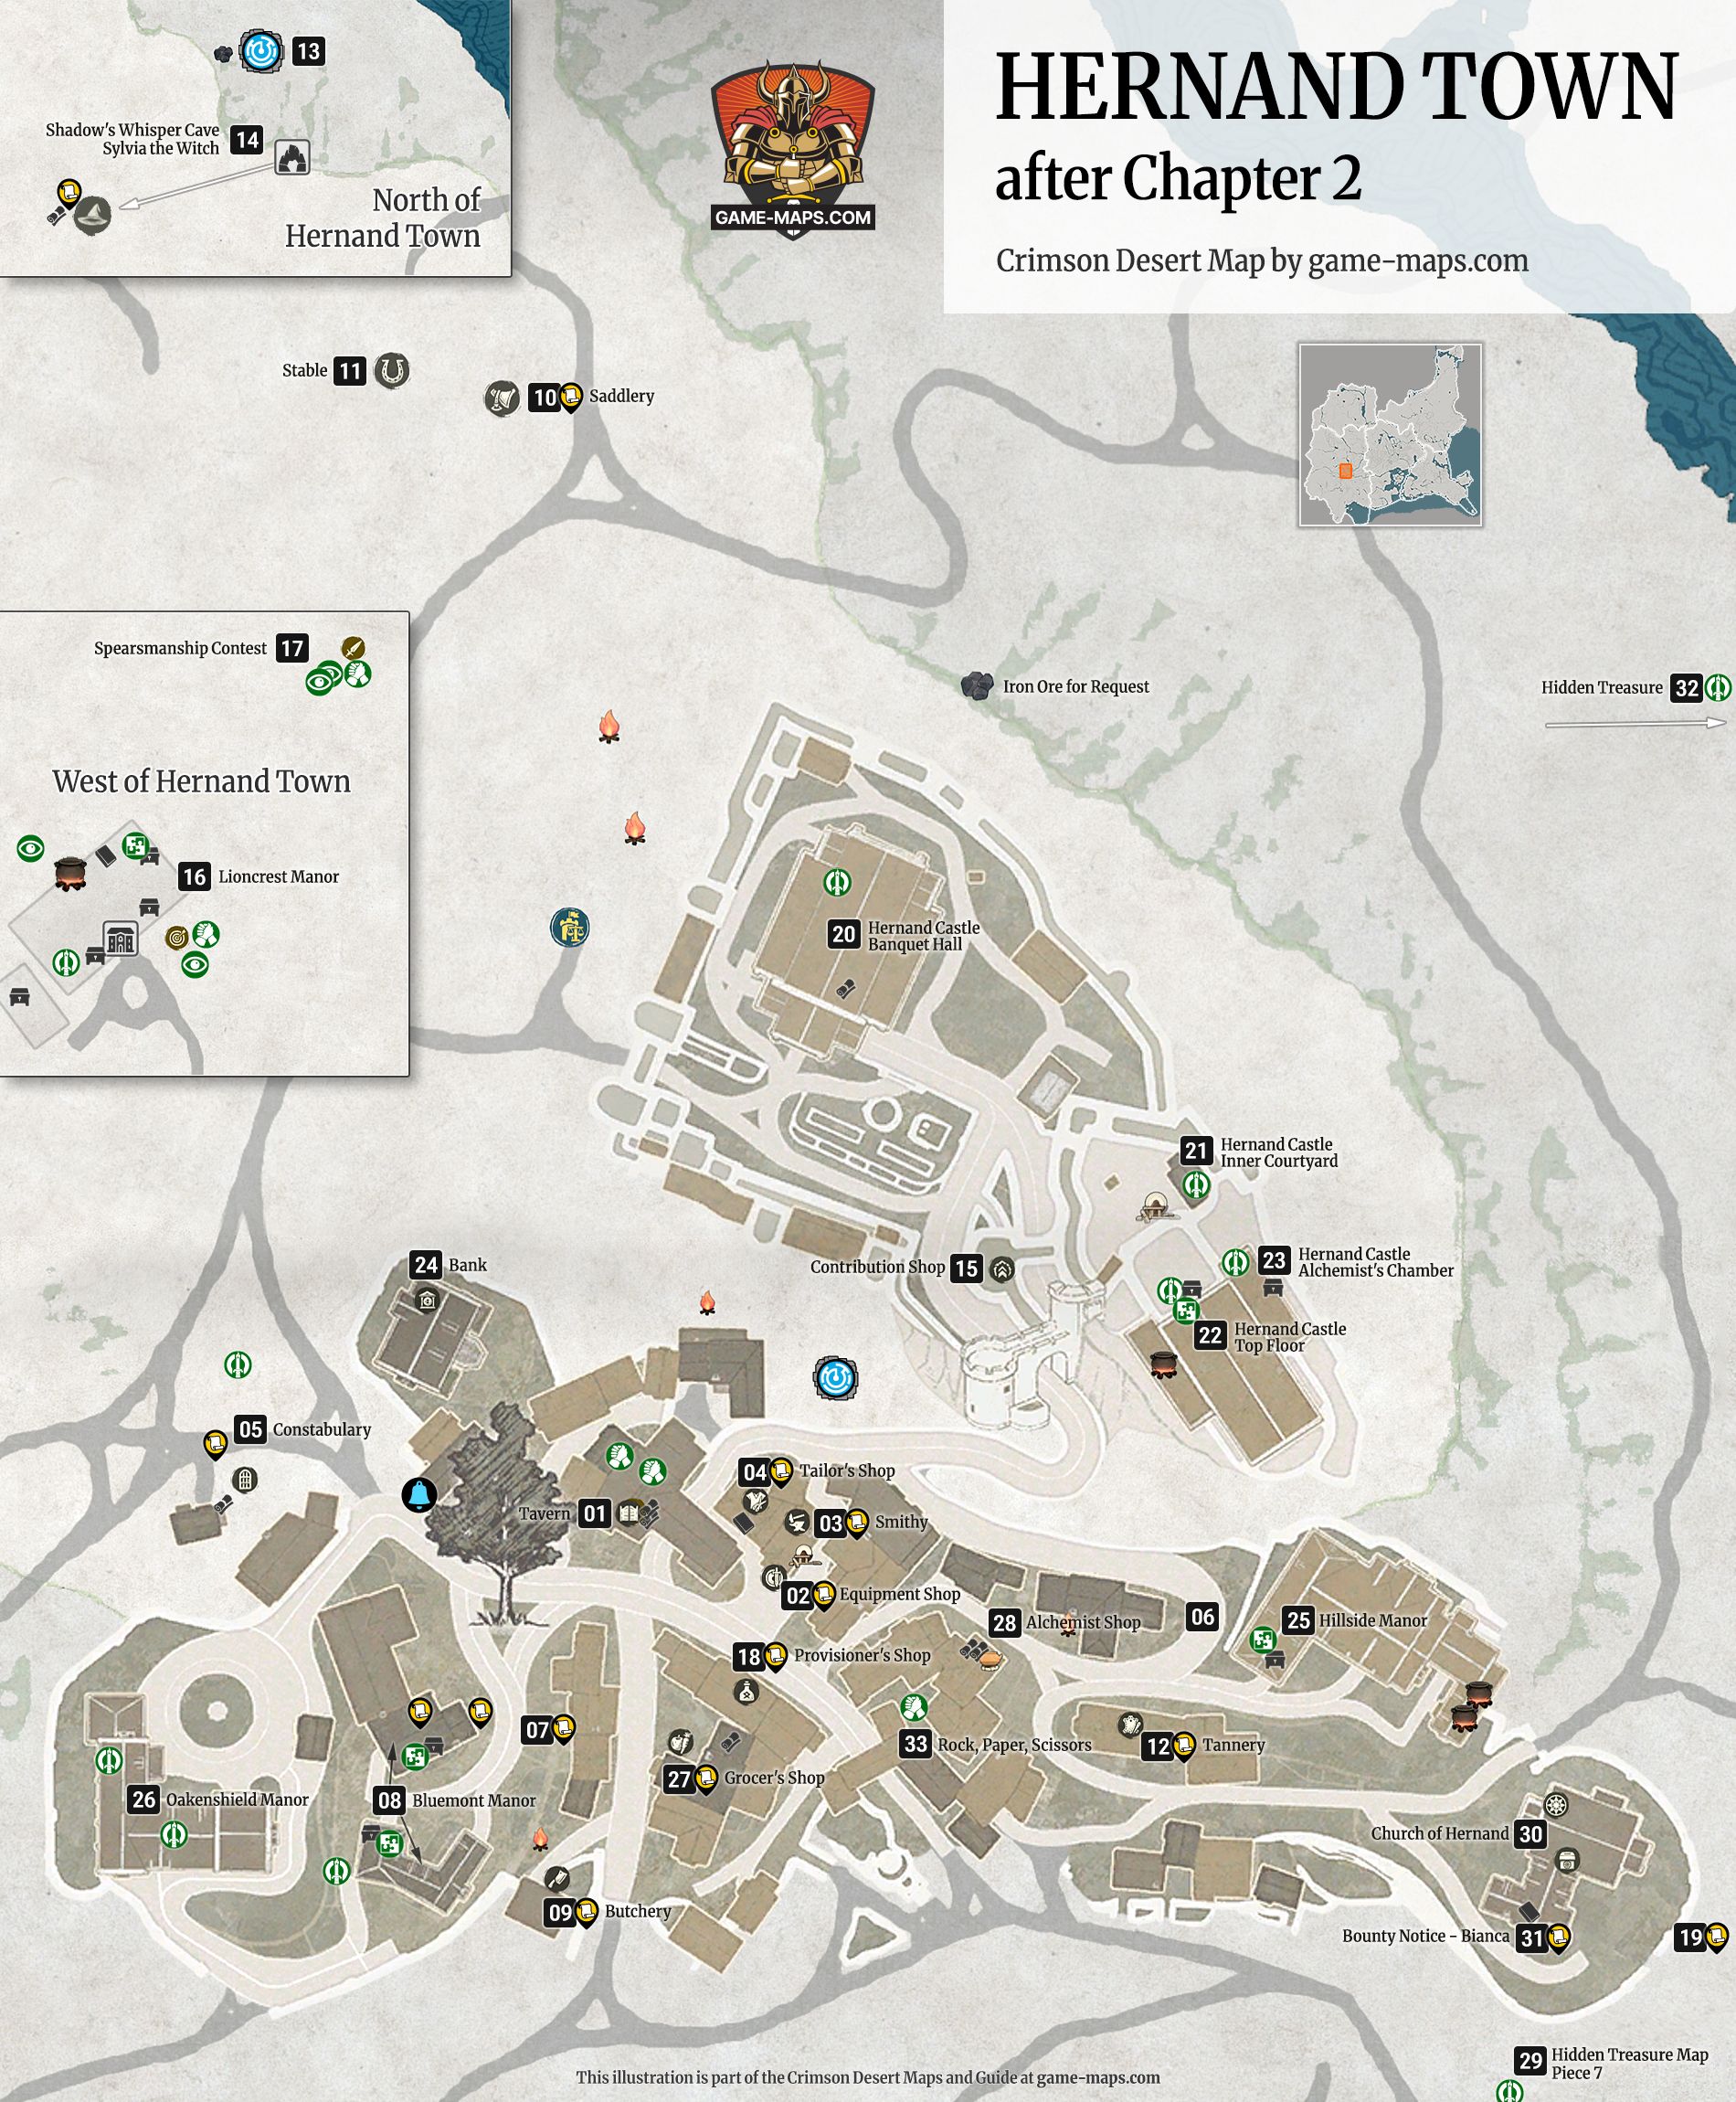
Hernand Town in Chapter 2
Chapter 3: Homestead
Crimson Desert Walkthrough: Hernand in Chapter 2
This walkthrough covers the areas you explore in Chapter 2: Golden Greed only and details the activities available during this stage of the story. Some spots in these zones won't be accessible until later in the game.
Note that Hernand Town isn't included here, as it's located on the next map.
| No. | Description | |
|---|---|---|
01 |
The beginning of Chapter 2: Golden GreedRulupee's lost pendant began to shine shortly after returning from the mysterious world of the Abyss. Where the Light LeadsMain Quest, Chapter 2: Golden Greed / Unexpected Gift It showed you that you should head to Lioncrest Watchtower. You’ll get a letter about Abyss Nexuses from White Crow, delivered by pigeon. | |
02 |
Lioncrest WatchtowerLioncrest Watchtower is under siege by bandits. Your first priority is to take them all out. Before heading inside, scout the area around the tower. You can grab whatever loot the bandits dropped and pick up any items scattered nearby. The entrance to Lioncrest Watchtower is covered in ivy. Burn through it with a Fire Arrow to get inside. To use Fire Arrows, draw your bow and walk up to a flame with the arrow notched. The tip will catch fire. Inside the tower, you'll find some items, including two chests on the stairs and one on last floor, and one on the roof of tower. You can reach the roof through a hole in the ceiling of the top-floor room. Watch your step, there are traps on the staircase. The main goal of your visit to Lioncrest Watchtower is to obtain the Visione, a special helmet that lets you read Memory Fragments, echoes of past events. You’ll find the Visione at the top of the tower. Pick it up and put it on. Memory FragmentMain Quest, Chapter 2: Golden Greed / Unexpected Gift
You'll find the first Memory Fragment in the same room where you pick up the Visione.
The second Memory Fragment is located right outside the tower entrance. | |
Memory Fragments and Visione helmet

Memory Fragments are pieces of the past, visions you can trigger using the Visione helmet.
Use your Lantern to track down locations where these fragments can be recovered. They’ll appear as blurred, moving blue shapes. Make sure you actually have the Visione equipped. These visions bring back useful memories that often serve as clues.
| No. | Description | |
|---|---|---|
03 |
Meet Rulupee the her catYou’ll run into Rulupee and her Black Cat just outside the walls surrounding the tower. Make sure to talk to them. ReunionMain Quest, Chapter 2: Golden Greed / Unexpected Gift Follow the cat. | |
04 |
Meandering Hills RuinsFollowing the cat will lead you to the Meandering Hills Ruins.
Nature's Gasp will alow you to lift or move heavy objects and remove obstracles. Open cave with Nature's Gasp and enter inside.
Focus will regenrate Spirit.
Use Force Palm on the three large pressure plates on the wall to get the energy flowing and activate the Abyss Cresset. Hit them in this order: middle, right, then left. Head outside and grab the Abyss Artifact from the Abyss Cresset.
You’ve cleared the Abyss Cresset puzzle. From now on, this spot, and any other Abyss Cresset you activate, acts as a Fast Travel point. | |
05 |
BilwiseTalk to Bilwise, Bilwise will boost your Spirit. Bilwise: A shai with a puzzling personality. She's carefree to a fault, forever rambling on about herself. She's taken an interest in Kliff since he earned Alustin and White Crow's recognition. At Rulupee's urging, she prepared a gift for him, and used her pendant to guide him to it. Go to Hernand Square. | |
06 |
Hernand SquareFor HonorMain Quest, Chapter 2: Golden Greed / Hernand in Chaos There is a group talking about the Greymanes. Speak with them to see if they have information regarding your comrades’ whereabouts. Approach the group talking about Greymanes. Talk to Matthias.
Matthias challenges you to a duel. This is your first real boss fight. It shouldn't give you much trouble since he’s going easy on you. Besides, it’s just a duel, not a fight to the death. Matthias: Leader of the Order of Light. Once a knight sworn to a noble house, he upheld his honor and courtesy even after his lord's fall. Though now a knight-errant, he's never let his code slip and he gathered like-minded companions to found the Order of Light. He takes great pride in his swordsmanship, and relishes the chance to spar with worthy opponents. AwestruckMain Quest, Chapter 2: Golden Greed / Hernand in Chaos A man has been watching as if waiting for the duel to end. See what he wants. Talk to the Noble who watched your duel. This is Barden Middler, Marshal of Hernand. He wants to recruit you to help restore order in the city. You agree to the proposal, expecting some solid rewards down the line. Barden Middler: Marshal of Hernand. He serves under Marquis Serkis with unwavering loyalty. As Marshal, he puts the region's peace above all else, and the townsfolk respect him for his efforts even with the unrest growing in the area. Go to Springtide Mill [07] and defeat bandits. | |
07 |
Springtide MillSpringtide Mill: A watermill south of Hernand. It is the primary production site for grain flour in the area. Its high operational efficiency makes it a vital distribution hub for merchants across the region. Shadow Cast Over the RiverMain Quest, Chapter 2: Golden Greed / Hernand in Chaos Bandits have taken control of both the floodgate and bridge, the lifelines of Hernand. They are robbing travelers and obstructing the water flow, causing the entire town to suffer. Defeat the enemies around Springtide Mill. | |
08 |
Notice BoardWhere Misery GathersMain Quest, Chapter 2: Golden Greed / Hernand in Chaos True to the Marshal's word, the mood in the village is tense. A string of suspicious incidents seems to be at the root of it all. Check the notice board to get the full picture. After taking down the enemies, head over to the notice board and check the available quests.
You'll pick up four more Main Quests from Chapter 2: Golden Greed. Trial After TrialMain Quest, Chapter 2: Golden Greed / Hernand in Chaos A citizen of the town has apparently lost his cattle to bandits, leaving him with no means of livelihood. Listen to the farmer's story. Speak with the despairing man. The Man Trapped in the MireMain Quest, Chapter 2: Golden Greed / Hernand in Chaos A rancher says bandits have cut off the precious horns of his goats. Listen to his story. Speak with the enraged man. Missing CompanionMain Quest, Chapter 2: Golden Greed / Hernand in Chaos Unknown assailants have apparently taken a child's animal companion, Wooly, by force. Listen to the child's story. Speak with the crying child Secrets Hidden in the DarkMain Quest, Chapter 2: Golden Greed / Hernand in Chaos They say there’s a Greymane in town. Look for your potential comrade. You can tackle them in any order you want. | |
09 |
Trial After TrialTalk to Bremer for Main Quest: Trial After Trial. Bremer: Owner of a cattle ranch, and a devout follower of Solumen. His home was destroyed when a sky boulder came crashing down. And before he could even get back on his feet, bandits made off with all his cattle. All of Hernand has heard of his misfortune. Follow the rumors to [10]. | |
10 |
Talk to Herblist for Main Quest: Trial After Trial. Follow him on horseback to Anvil Riverside Bandit Camp [11] | |
11 |
Anvil Riverside Bandit CampFor Main Quest: Trial After Trial. Kill Bandits. Raise your lantren and search location. Read the memory on the cows whereabouts.
Return to Bremer [09]. | |
12 |
Capra PastureCapra Pasture: A goat farm on the outskirts of Hernand. It produces high-quality cheese and operates year-round, frequently employing residents from the nearby hovels. Talk to Ibano for Main Quest: The Man Trapped in the Mire. Ibano: Owner of Muckroot Ranch. The whole village knows him for his temper and endless chatter. Perhaps that's why no one feels sorry for him, even after being robbed, having his goats' horns lopped off, and losing nearly everything he owned. Go to [13]. | |
13 |
BanditsFor Main Quest: The Man Trapped in the Mire. Kill Bandits. Raise your lantren and search location. Read the memory on the mysterious horn thief.
Pick up from the ground Quest Item: Mysterious Elixir. It's a small brown bottle sitting among the crates and other junk in the bandit camp. Return to Ibano, he is not in Capra Pasture but in Muckroot Ranch [14]. | |
14 |
Muckroot RanchMuckroot Ranch: A ranch established by the goatherd Ibano. It was built by reclaiming barren land that was once difficult to cultivate. Today, it has become a ranch where goats roam freely. For Main Quest: The Man Trapped in the Mire. Give back Quest Item: Mysterious Elixir to Ibano. | |
15 |
Bloomwood RanchBloomwood Ranch: A ranch where the Goldleaf Merchant Guild's livestock are managed. It is a popular hub for livestock trading. Thanks to its excellent security, some even pay a fee to board their animals here. For Main Quest: Missing Companion. Talk to Willian, the crying boy standing under a tree with a group of kids. Willian: A young shepherd and the ranch owner's son. The villagers adore him for his pure and innocent heart, but they also call him "Willian the Crybaby", for how easily he tears up. He cares deeply for the ranch's sheep, naming them and treating them like family, which has started to worry his father.
| |
16 |
For Main Quest: Missing Companion - Gather information on the missing sheep from the man and the children. Talk to Herder. Talk to Girl. | |
17 |
Find Wooly, the sheepFor Main Quest: Missing Companion. Kill all bandits first. You'll find Wooly in a small, circular pen. Just grab her, hoist her onto your shoulder using the [Carry] command, and walk back to Bloomwood Ranch [14] to return her to Willian. It turns out this isn't actually Wooly, but Willian is happy either way. Once you finish the Main Quest: Missing Companion, follow Willian. He wants to show you another Greymane somewhere in the village. He isn't in the village, but you'll find him nearby along the road where a conversation is taking place. | |
18 |
Boris fake GreymaneFor Main Quest: Secrets Hidden in the Dark. Talk to Boris, who's claiming to be a Greymane. He’s harmless and will lead you to Spectre's Hideout [18]. Just follow him on horseback. Boris: A drunkard who claims to be a Greymane, soaked in ale and delusion. He means no harm, truth is, he admires the Greymanes so much that he even traveled to Pailune hoping to join them in his youth. But the journey went nowhere as one too many pints made him forget his purpose and he simply wandered back home. | |
19 |
Spectre's HideoutSpecter's Hideout: A large cave south of Hernand that shows traces of past human habitation. Its vast interior is frequently occupied and used by bandits. All around are signs of animals taken from villagers, confined and butchered, with marks of the grisly work left scattered throughout. For Main Quest: Secrets Hidden in the Dark. Boris shows you entrance to bandits cave. Kill bandits, enter and investigate the suspicious cave.
Memory Fragment containing the memory of the mastermind behind the incidents in Hernand. There are also Chest and Palmar Pill in the cave, take them and go outside. Talk ot the guards outside cave. Now, investigate the Goldleaf Trading Post [20]. | |
20 |
Goldleaf Trading PostGoldleaf Trading Post: The Goldleaf Merchant Guild trade hub where goods from across the land are exchanged. Guild guards are stationed here to oversee the trade of various wares. Rumor has it that some offer bribes in hopes of securing lower prices. The Dark VeilMain Quest, Chapter 2: Golden Greed / The End of Greed In Goldleaf Trading Post talk to Shakatu. Shakatu: The trademaster of the Goldleaf Merchant Guild. He was one of the first to hold an aversion to the Hornsplitter, due to his running of the guild with blood and violence. While his own ambitions are no less grand than Hornsplitter's, he possesses the discipline to temper them with his own personal philosophy. Your conversation with Shakatu is cut short by a cry for help from a Nun standing nearby. The Flames of GreedMain Quest, Chapter 2: Golden Greed / The End of Greed A nun is calling for help in the middle of the road. See what's going on. Speak with the Nun asking for help. She asks you to head over to the Healer's House to help with a rescue. Go to Hubert's House [21]
Trade Goods Black Market: A black market for trade goods secretly operated by the Goldleaf Merchants. Rare items that are difficult to reveal to the world can be discreetly traded here. Groks: A black-market merchant of the Goldleaf Trade Post. As a Goldleaf Merchant Guild veteran, he was dispatched to oversee discreet deals that sit on the line between legal and illegal. Local bandits bear him a grudge and have begun threatening the post. Yet, he cannot report them to the guards without risking his own dealings being exposed. | |
21 |
Hubert's HouseHubert: A scholar and healer in Hernand. He is deeply respected by the townsfolk for his compassion and care towards the sick and poor. His faith in Solumen drives his kindness, while his scholarly curiosity keeps him chasing new medical knowledge. For Main Quest: The Flames of Greed. Hubert’s House is on fire, and someone is trapped inside. You need to get them out. Use [Nature’s Grasp] to clear the wooden beam blocking the entrance. Sidestep the flames, pick up Marten using [Carry], and bring him outside to the waiting crowd. Hubert isn't in the burning building, he’s been kidnapped, and it's up to you to save him. Kidnapped HealerMain Quest, Chapter 2: Golden Greed / The End of Greed. Bandits have kidnapped Hubert, the healer. Rescue him and listen to his full account of the events that transpired. Rescue the kidnapped healer [22]. | |
22 |
Kidnapped HealerFor Main Quest: Kidnapped Healer. Kill bandits. Talk to Hubert, who is tied up in the middle of the camp. Untie him, then head over to see Shakatu at [23]. | |
23 |
Shakatu's CampRebellion or RevolutionMain Quest, Chapter 2: Golden Greed / The End of Greed. Find Shakatu to confirm the details of the incidents in Hernand and settle the matter once and for all. As soon as you enter, you’ll be ambushed by Shakatu's Soldiers. Take them out. Toward the end of the fight, Shakatu will show up to break things up. Follow him and strike a deal to stage a coup. Now, head over to Hornsplitter’s Camp [24] and take him down.
Discover the nearby Abyss Nexus. | |
24 |
Hornsplitter’s CampCheers Echoing From the EdgeMain Quest, Chapter 2: Golden Greed / The End of Greed. Find and defeat the Hornsplitter to resolve the matter. You’ll run into large groups of low level enemies on your way to Hornsplitter’s Camp. Consider this a warm-up for the fight with Hornsplitter himself. It’s going to be a tougher encounter, so make sure to save your game. You have to kill Kailok the Hornsplitter.
Fighting Kailok the Hornsplitter is your first major test, and you’ll need to play defensively.
Block and ParryBlock and Parry share the same button: [Ctrl] on PC, [L1] on PS5, and [LB] on Xbox.
It takes some practice, but once you get the hang of it, it’ll become your bread and butter for melee combat. | |
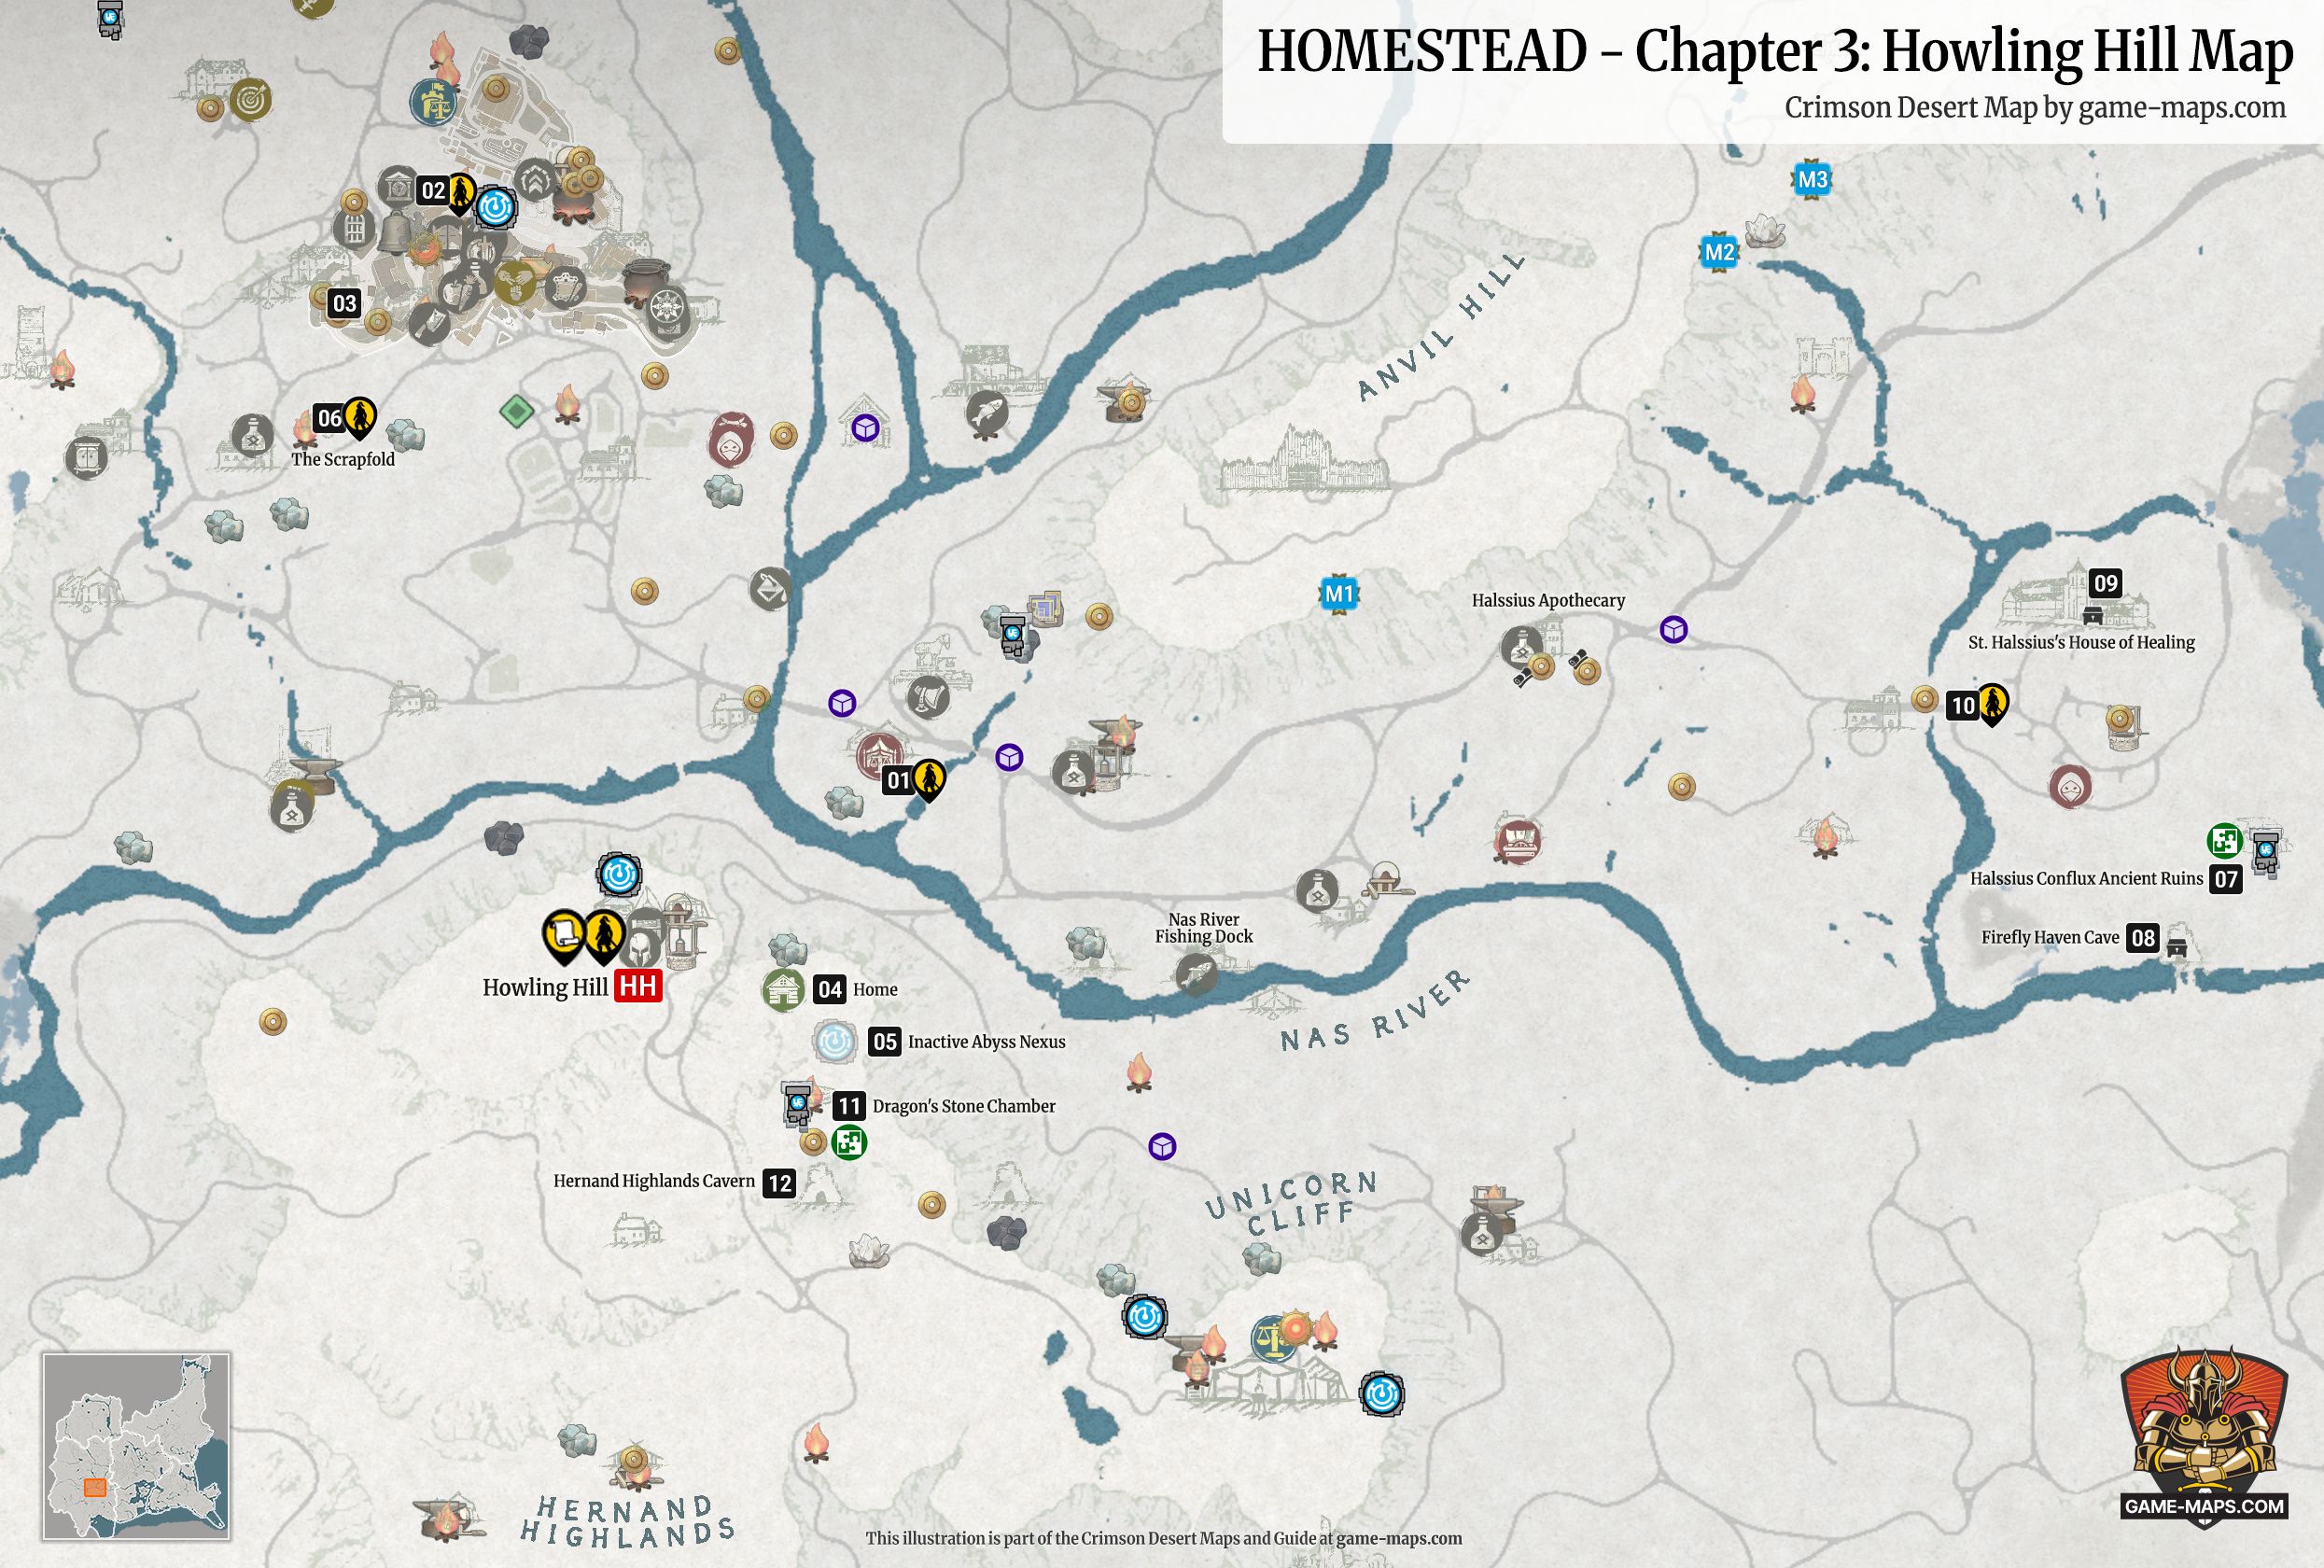
This is end of Chapter 2: Golden Greed, and start of Chapter 3: Howling Hill
Hold off on the Chapter 3: Howling Hill quests for now. We’re going to scout the outskirts of Hernand Town first, then head inside to explore the city itself.
Not every location in this area is accessible or fully functional at this point in the story. The list below covers everything you can actually explore right now.
| No. | Description | |
|---|---|---|
25 |
Sealed Abyss Artifact: Keeping Balance on the Wind
Combat Challenge: Walk 10 meters highlining. This challenge is straightforward. Once you get back to Hernand Town, find a long roof and walk along its ridge. | |
26 |
Nas River ShrineNas River Shrine: A shrine where the Greymanes exchange information. Located along the Nas River in central Hernand. This ordinary-looking shrine, easily overlooked by passersby, was apparently once used by the Greymanes to relay information, but its purpose is now unclear. You’ll find the Greymane "mailbox" right here.
Combat Challenge: Hit enemies 30 times with a spear within 30 seconds. The Spear is leaning against the roof of the Nas River Shrine. | |
27 |
Sealed Abyss Artifact: Sword of Trials III
Combat Challenge: Defeat 3 enemies with a one-handed sword without taking damage. | |
28 |
Sealed Abyss Artifact: Shield of Unchanging Will I
Combat Challenge: Defeat 3 enemies with a shield. | |
29 |
Sealed Abyss Artifact: Sword of Trials I
Combat Challenge: Defeat 3 enemies within 30 seconds with a one-handed sword. | |
30 |
Sealed Abyss Artifact: Sliding down the Slope
Combat Challenge: Slide down 50m. | |
31 |
Abyss Cresset: A Hill Guided by Light
This Abyss Cresset is an easy win. You just need to climb to the top of the hill while avoiding the different poisonous plants growing all over it. | |
32 |
Timberham SawmillTimberham Sawmill: The sawmill responsible for timber production in Hernand. Managed by Baron Alfonso, this facility handles reforestation, maintenance, as well as logging.
Vincent: A furniture merchant of the Timberham Sawmill. He crafts high-quality, practical furniture using timber produced in Timberham. With refined taste and careful hands, his work is beloved by the people of Hernand. | |
33 |
Communal Training GroundsCommunal Training Grounds: A swordhall in the hovels, run by a strict master of swords. He cares for the local residents while teaching them the way of the blade. His pupils either depart as swordsmen or stay to achieve mastery, dedicated to preserving their teacher's legacy. You'll come back here later in the game. For now, you can try watching the warriors and children training. Make sure to return down the road to keep observing them.
| |
34 |
Goldenfist ArenaGoldenfist Arena: An arena operated by the Goldleaf Merchant Guild. High-stakes fights take place here every day. Renowned as a gathering place for true fighters, winning here is considered a great honor.
Unarmed Duel is a sacred battle fought with only fists and footwork. Pressure your opponent with relentless strikes, evade their attacks, and seize the moment to counter. Only those who master distance and timing can be the last one standing in the ring. Warning: Using any weapons or attack styles that do not comply with the rules will result in immediate disqualification. You must be unarmed to start Duel. How to go Unarmed in Crimson Desert.
| |

| No. | Description | |
|---|---|---|
35 |
Bluemont Cask HouseBluemont Cask House: A warehouse that stores fruit wine from the Roberts Estate. The Count personally oversees the production of banquet wine, even importing exotic fruits. | |
36 |
Equinsher SaddleryEquinsher Saddlery: A saddlery that produces and sells saddles and various types of tack. It bustles with travelers passing to and from the trading post.
Bruna: A saddler of Hernand. Catering primarily to the Hernand villagers, she crafts horse tack with the comfort of both horse and rider in mind. Lately, she has been wondering if her saddles need a special decorative touch to truly stand out. | |
37 |
Goldleaf GuildhouseGoldleaf Guildhouse: The headquarters of the Goldleaf Merchants, who use Hernand as their base. They exert influence over the entirety of Hernand's economy and society. While their trade prices are generous, breaching a contract carries a brutal penalty.
Trading Center: A trading center operated by the Goldleaf Merchant Guild. Ugmon, the manager, is a skilled merchant who has dozens of expressions in a single trade, making even haggling feel like entertainment. Ugmon: The director of the trading center of the Goldleaf Merchant Guild headquarters. A merchant who thrives on wit and smooth talk, he makes even haggling feel like entertainment and wins customers over. He wants to turn the honey supplied by a nearby apiary into the Goldleaf Merchant Guild's flagship product. | |
38 |
Lightning-Struck Tree
| |
39 |
Someone Living Under a Bridge
Check below bridge. | |
40 |
Dante and the Bleed
Inside house. | |
41 |
Dyehouse
A dyehouse run by Theoric. You can dye your weapons and armor in beautiful colors. Theoric: A dyer of Hernand. He sticks to traditional dye-making methods, producing stable, consistent colors every time. Those standards are exacting, though, and lately he has struggled to find the materials needed to achieve the hues he wants. | |
42 |
Livestock FenceLivestock Fences facilitate the illicit trade of animals. They accept livestock such as cows, goats, sheep, pigs, ducks, and chickens. Approach a fence while carrying or riding the animal you wish to sell to begin a transaction.
Rumor has it that Edmond in Hernand takes livestock of questionable origin off your hands. Edmond: A livestock fence of Hernand farmhouse. No one can say for certain who he is, but one thing is clear: he is not a Hernand local. He appeared out of nowhere one day and began buying up livestock, and "Edmond" may not even be his real name. | |
43 |
Back Alley Shop
Grimrak: A back-alley merchant of Hernand Farmhouse. His main customers are Hernand's common farmers, and he discreetly supplies "certain items" that would be mortifying if discovered. Of course, he also stocks useful goods for those with no interest in that side of his trade. Got some Blueprints | |
Now, let’s explore Hernand Town before we move on to the Chapter 3 locations.
Next: Crimson Desert Map: Hernand Town.
Let’s see what Hernand Town has to offer after completing Story Chapter 2 and before diving into Story Chapter 3.
Crimson Desert Map Legend
| No. | Description |
|---|---|
Main QuestCrimson Desert's story is split into a Prologue, 12 Chapters, and an Epilogue. Every section is broken down into two or more Sub-Chapters, which house the Main Quests driving the narrative. You'll need to tackle these in a specific order. Most of them kick off automatically once you wrap the last one, and you'll only ever have one active quest at a time. The starting locations for Main Quests are marked on my maps. Sticking to the main story is easily the best way to see everything the game world has to offer. | |
Faction QuestFaction Quests in Crimson Desert act as side missions, completely separate from the main story and tied directly to the Reputation System. You'll run into new Faction Quest as you hit new areas and build your standing with Factions or with Main Quest progress. Every quest you finish for a specific group increases your Contribution Rank, giving you access to more work and their specific services. Rewards go beyond just reputation, you're also looking at Abyss Artifacts, Skills, Inventory Expansions, and Camp Upgrades. | |
Notice BoardNotice Boards are a vital hub for tracking down side activities in Crimson Desert. They're packed with Bounty Posters and Requests & Commissions for new quests, alongside Vendor Advertisements that lead you to interesting merchant spots. Once you snag a flyer, you actually have to read it. Give it a close look to catch any hidden clues. You won't always get a clear map marker, so you’ll need to dig into the text to figure out where to go. Notice Board listings can refresh as you get further into the game. | |
Abyss NexusAbyss Nexuses act as fast travel points in Crimson Desert. You first need to find and activate one before you can use it. When you're nearby, use your Lantern or the Blinding Flash skill, then simply stand on the Abyss Nexus. Once it's active, you can fast travel to this location just by clicking the icon on your in game map. You might run into a "broken" Abyss Nexus, which you'll need to fix by solving a straightforward environmental puzzle. | |
Abyss Gate (one way from Pywel to Abyss Islands)The Abyss Gate is a portal that transports you one way from Pywel to the Abyss dimension. Various gates scattered across Pywel lead to different locations in the Abyss. These operate strictly as one-way passages and do not function like Abyss Nexuses. You will find the first Abyss Gate in Hernand Castle during Chapter 1. | |
Abyss Teleporter (one way between Abyss Islands)The Abyss Teleporter moves you one way between Abyss Islands. You use it as a one-time trip to reach a new, previously unvisited island for the first time. It leads from a completed island to a new, unvisited one. It usually sits at the end of the area you are currently exploring and pops up once you finish The Abyss Restoration Challenge on that specific island. | |
Skybridge GateThe Skybridge Gate activates on an Abyss Island once you finish restoring that specific island. This gate and its Alignment Device let you rebuild destroyed Abyss Skybridges that lead to the next part of the island. Pass through the gate and use Axiom Force on the Alignment Device to set the right position and restore the path. Getting the correct alignment is straightforward. Just rotate it until it stops, as there are no complex puzzles involved. | |
Abyss Restoration ChallengeEvery island in the Abyss needs restoration before it becomes fully functional. The Abyss Restoration Challenge monument is where you claim your reward after finishing a Challenge task. Restoration usually involves puzzles, ranging from straightforward tasks to complex, multi-layered brain teasers. Your reward is typically an Abyss Artifact used to gain a Skill Point. | |
Abyss CressetAbyss Cressets are challenges you'll need to beat for a reward. These tasks range from solving logic and physics Puzzles to winning duels or even learning up new techniques. Once finished, you'll open up an Abyss Nexus fast travel point at that spot and score an Abyss Artifact (Skill Point). | |
Puzzles and riddlesPuzzles and Riddles are baked into the Crimson Desert experience, and you'll run into plenty of them across both Pywel and the Abyss. The variety is solid, ranging from Ancient Ruins Puzzles to Abyss Restoration Challenges, as well as Labyrinths and Mazes. | |
Memory FragmentsMemory Fragments are pieces of the past, visions you can trigger using the Visione helmet. | |
Learn SkillSome abilities and skills are learned simply by watching others. You can pick them up by observing Echoes, people going about their business, or enemies in the heat of combat. | |
Sealed Abyss ArtifactSealed Abyss Artifacts are physical items scattered throughout Pywel. Grabbing one triggers a specific Challenge. Once that's finished, you can "unseal" the item right in your inventory to get an Abyss Artifact, a Faded Abyss Artifact, or some Abyss Gear. Look for Sealed Abyss Artifacts along roads, usually tucked away in small stone altars or cairns. | |
Abyss ArtifactAbyss Artifacts work as a currency you can trade in for Skill Points to build out your character or boost your Health, Stamina or Spirit. You'll pick up Abyss Artifacts as you fill your XP bar, but they're also handed out for taking down bosses, finishing Main Quests, and solving puzzles at Abyss Cressets. | |
Faded Abyss ArtifactFaded Abyss Artifacts work just like Respec Tokens. Using one lets you reset your entire Skill Tree to get back all your regular Abyss Artifacts. They’re pretty rare and tough to find, but later in the story, you can pick them up from Witch Vendors or just craft them yourself. | |
BellsThere are eight Bells scattered across Bell Towers throughout Pywel in Crimson Desert. They're vital for exploration because each one clears the fog of war on map and reveals points of interest nearby. Once you find a Bell, climb the tower, ring it, and check in with the Shai Resident. This is all part of the Toll of Pywel faction questline. | |
Hidden SpacesSites of Trials and Secrets, there are 34 Hidden Spaces | |
|
|
BossesThere are 76 bosses in Crimson Desert. 28 Main Story Bosses and 48 World and Optional Bosses |
MountThere are 29 unique permanent mounts. 9 Horses, 5 Dragons & Wyverns, 3 Raptors, 3 Mechs, 9 Other. | |
MinigamesThere are approximately 30 distinct minigame types in the game, ranging from tavern gambling to high-stakes combat trials. | |
Landmarks and LocationsLandmarks represent larger map icons that describe an entire area rather than a specific item. Landmark Castle Mansion Village Camp Cave | |
ServicesInn Smithy Tailor's Shop Provisioner's Shop Grocer's Shop Tannery Saddlery Stable Equipment Shop Constabulary Confessional Bank Furniture Shop Dyehouse Black Market Livestock Fence Royal Trading Trading Center | |
Other map markersLoot Recipe Private Storage Bonfire Strongbox Blueprint Equipment Key | |
User Comments
All your comments, suggestions and corrections are very welcome. Your experience in the game will help other players. I will read each of your comments and try to add to the content on this page based on them. Thank You.