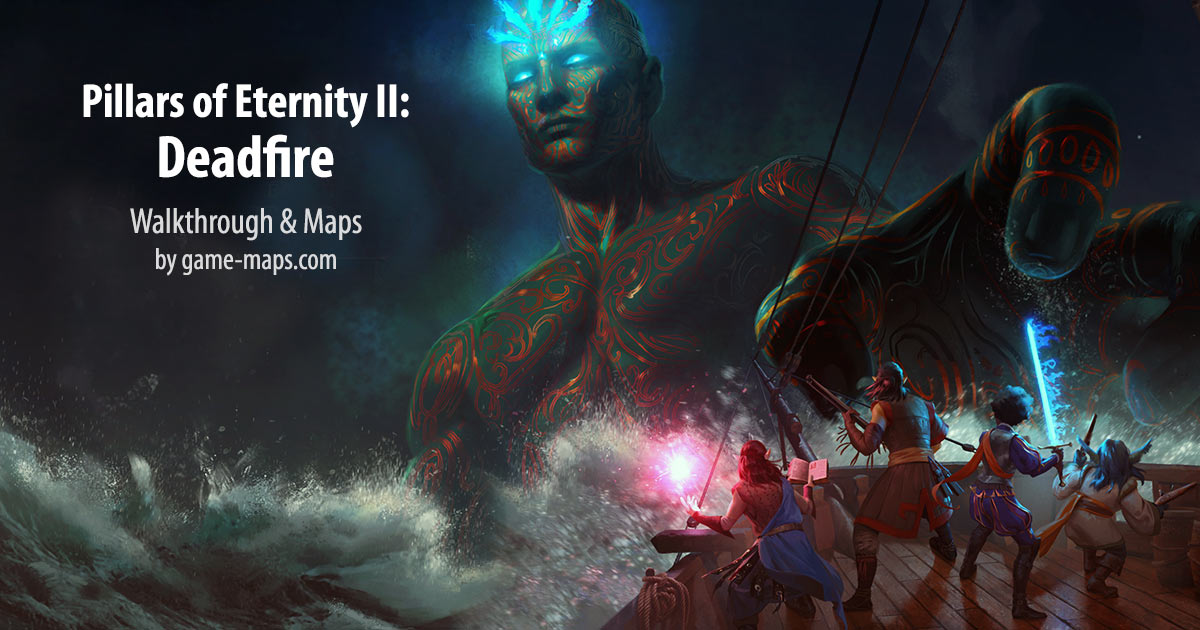
Pillars of Eternity II: Deadfire Walkthrough & Maps
Pillars of Eternity II: Deadfire Video Game Walkthrough. Pillars of Eternity II: Deadfire Maps of Deadfire Archipelago. NPCs, Quests, party members, secrets, treasures, monsters, traps, puzzles, skills, spells, weapons locations for brave adventurers.
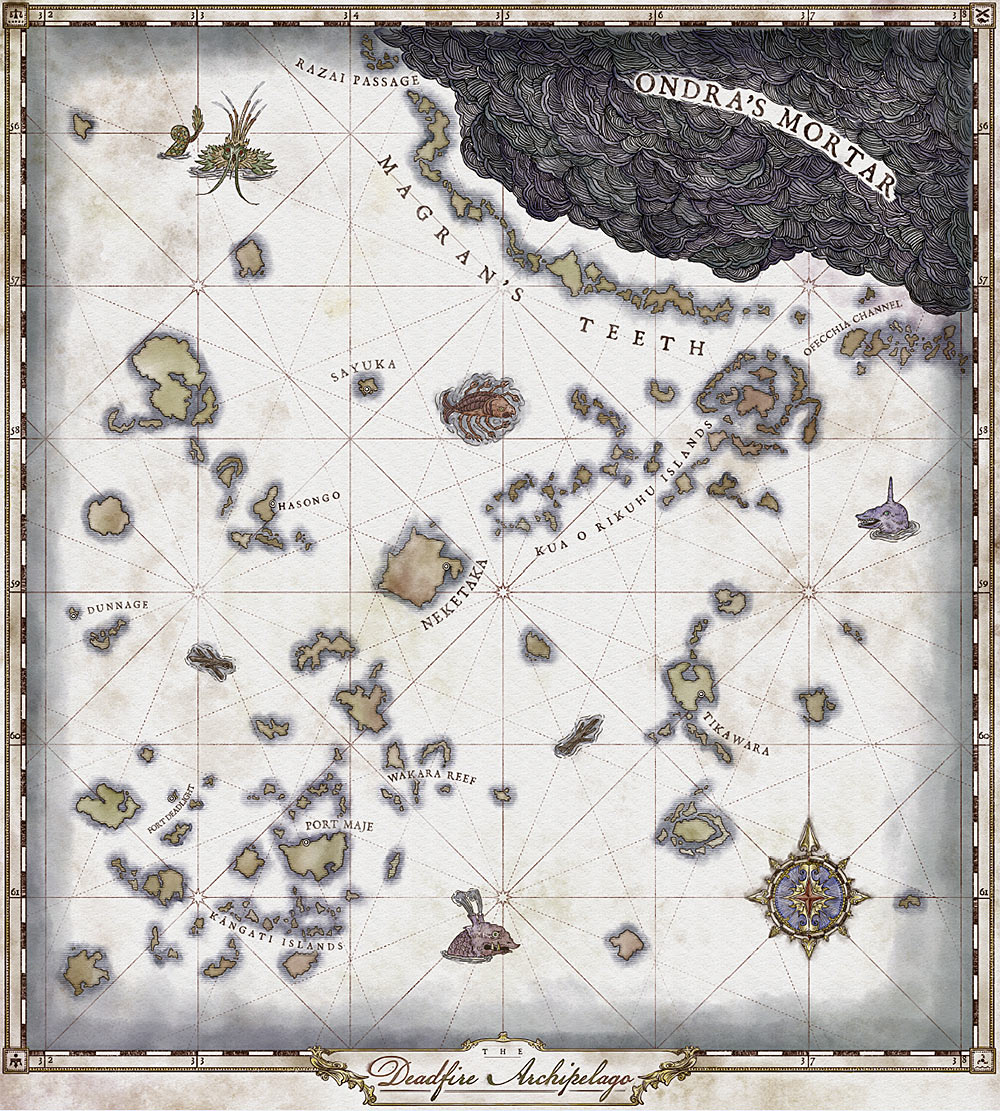
Deadfire Archipelago Maps
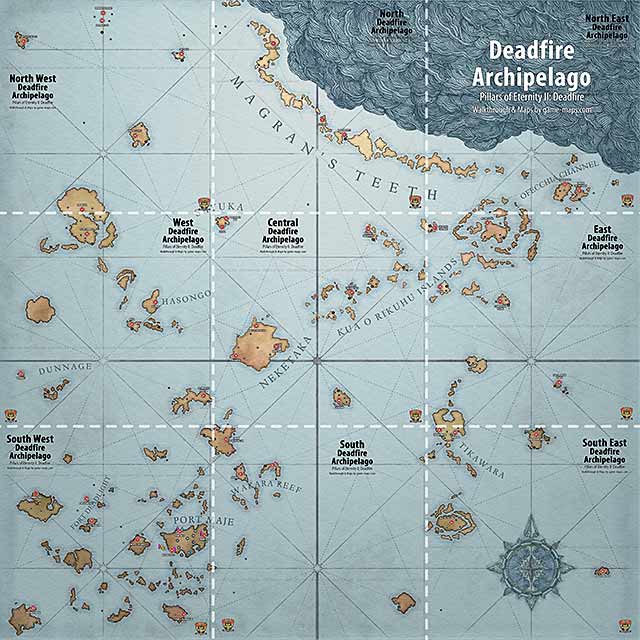
Deadfire Archipelago World Map
Enlarged and divided world map
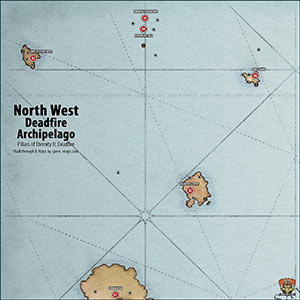
North Western Deadfire
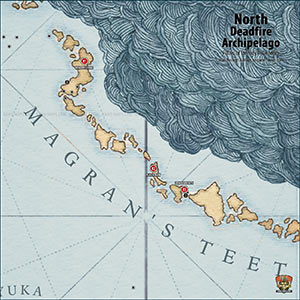
North Deadfire
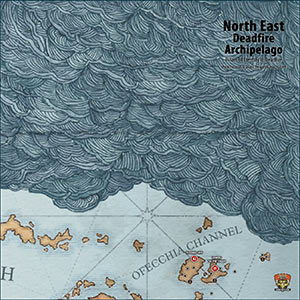
North Eastern Deadfire
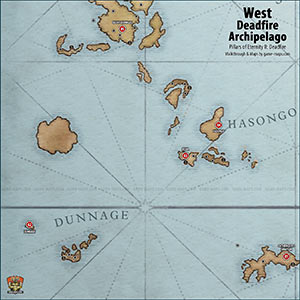
Western Deadfire
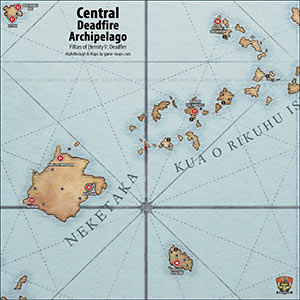
Central Deadfire
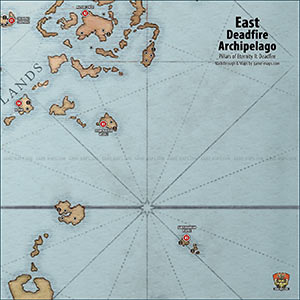
Eastern Deadfire
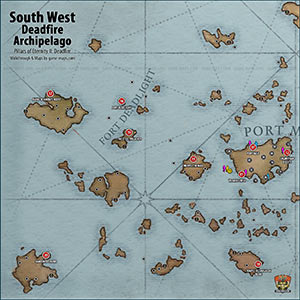
South Western Deadfire

Southern Deadfire
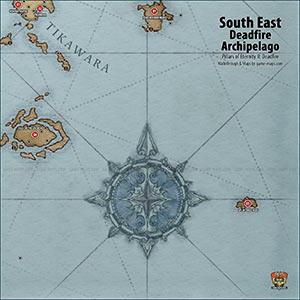
South Eastern Deadfire
South Western Region Maps

Vilario's Rest
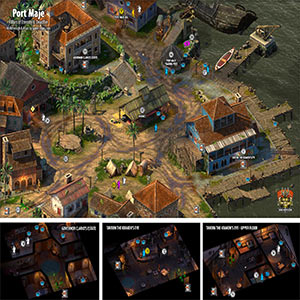
Port Maje Harbor
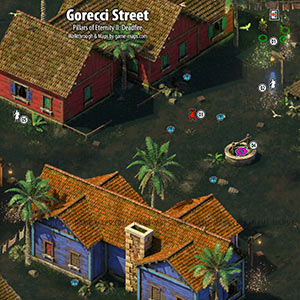
Gorecci Street
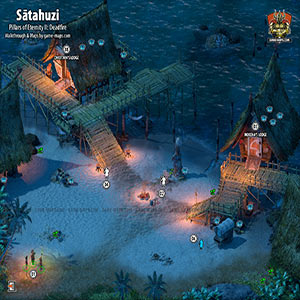
Sātahuzi
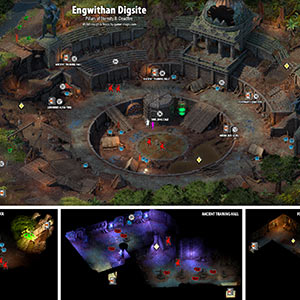
Engwithan Digsite

Arena Sub-level
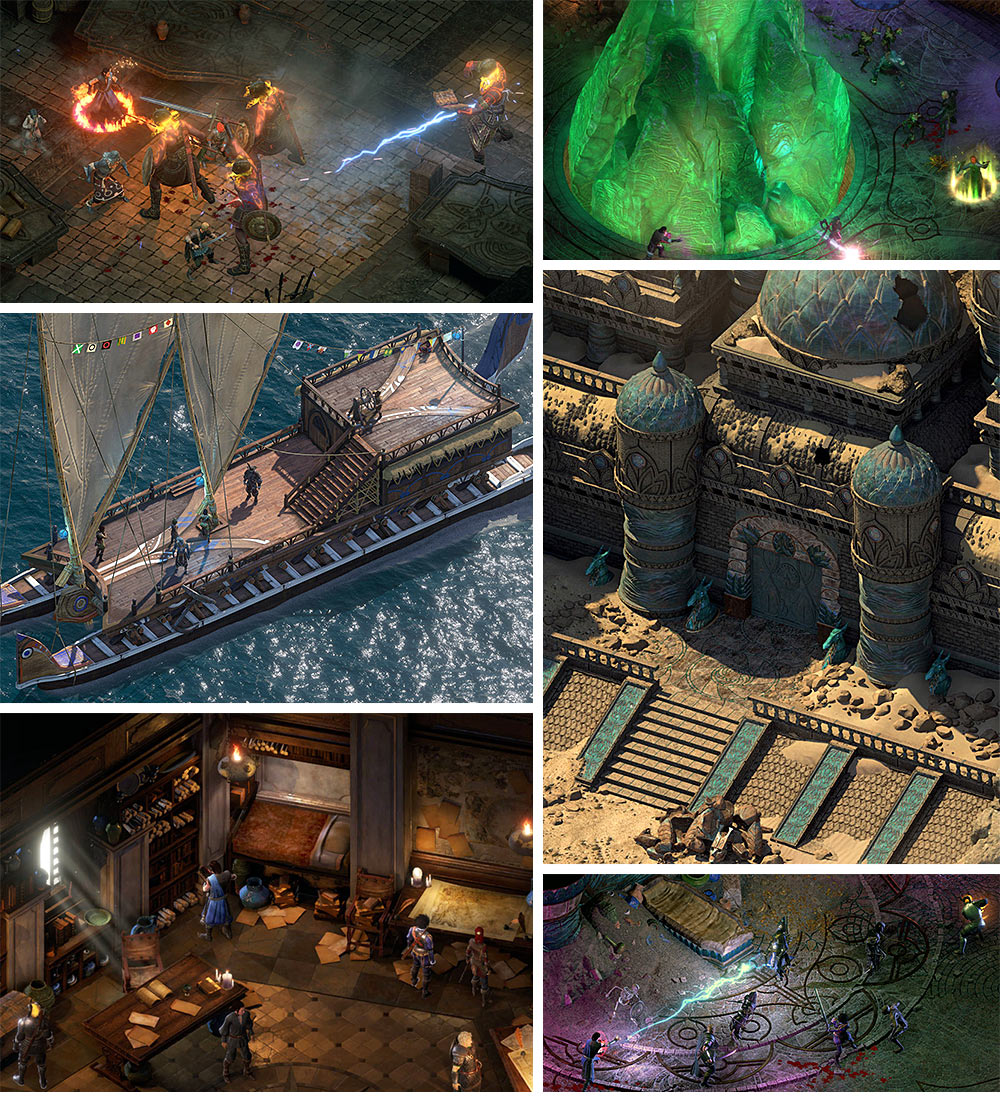
About Pillars of Eternity II: Deadfire Video Game
Pillars of Eternity II: Deadfire is Video Game, developed by Obsidian Entertainment www.obsidian.net and published by Versus Evil versusevil.com.
Game official release date: May 8, 2018 for Windows, Linux, macOS and Q4 2018 for Switch, PS4, Xbox One.
Pillars of Eternity II: Deadfire is a isometric perspective, single-player, party-based role-playing game (RPG). The game focuses on story telling, exploration, dynamic turn based combat, branching quests, world that reacts to your decisions.
You will find official game page at eternity.obsidian.net.
The god Eothas, once thought to be destroyed, returns to life in the form of a titanic statue – nearly killing you as he destroys everything in his path. It’s up to you, the Watcher of Caed Nua, to discover Eothas’ purpose and decide to help or hinder his efforts.
With an enormous open world, a massive cast of characters, beautiful hand-painted backgrounds, and a story you can play your way, Obsidian Entertainment is proud to bring you Pillars of Eternity II: Deadfire.
Deadfire Windows Minimum System Requirements:
- 64-bit processor and operating system
- Windows Vista 64-bit or newer
- Intel Core i3-2100T @ 2.50 GHz / AMD Phenom II X3 B73 or greater
- Memory: 4 GB RAM
- DirectX 11 Graphics Card Compatible
- 45 GB storage available space
- DirectX Compatible Sound Card
Deadfire Windows Recommended System Requirements:
- 64-bit processor and operating system
- Windows 10 64-bit or newer
- Intel Core i5-2400 @ 3.10 GHz / AMD Phenom II X6 1100T or newer
- Memory: 8 GB RAM
- NVIDIA GeForce GTX 960 Graphics Card
- 45 GB storage available space
- DirectX Compatible Sound Card
Pillars of Eternity II: Deadfire Game Guide - Tutorials, Tips and Info
Movement - To move selected characters, click on any open space on the map. All selected characters will move to their position in your current formation. Characters cannot move to any location where the cursor is a red circle with a slash through it.
Interact - Click on highlighted objects to interact with them. Each type of object has its own type of basic interaction. Doors will open or close, locked objects will be unlocked, items will be picked up, people in the world will speak with you, and enemies will be attacked.
Inventory - Press button in the lower center of screen, or use the [I] key, to open the inventory.
Equipping Items - If you click on an item in your inventory to pick it up, you can place it in any highlighted slot to equip it. You can also double-click items to automatically equip them.
Combat Introduction - Characters with a red selection circle are hostile to you. To attack an enemy with your currently equipped weapon, click their selection circle. You can also select the button in the lower center of the screen to put the cursor into the attack state. This will allow you to attack anyone, even friendly characters.
Dispositions - You have gained a reputation in a Disposition. Dispositions represent how people perceive your personality throughout the world. Even seemingly nasty reputations will be favored by some people, and benign reputations sometimes bring out the worst in certain people. No Disposition is inherently good or bad in Pillars of Eternity II: Deadfire. To see icons for the effects of dialogue decisions on Disposition, enable the "Show Personality/Reputation" option in Difficulty Settings.
Dispositions - Paladin and Priest - You have gained a reputation in a Disposition. Dispositions represent how people perceive your personality throughout the world. Even seemingly nasty reputations will be favored by some people, and benign reputations sometimes bring out the worst in certain people. No Disposition is inherently good or bad in Pillars of Eternity II: Deadfire. Even so, because your Watcher is a priest or paladin, you must be careful not to misalign their Dispositions with what is favored by their deity or order, respectively. Dispositions will modify the effects of Holy Radiance (for priests) and Faith and Conviction (for paladins) for the Watcher only.
Quest Journal - As you receive quests, your Journal will update with relevant information. If you are ever stuck, open it to review your notes by pressing the button in the lower center of the screen or the [J] key.
Dialogue - Click on the selection circles of friendly and neutral characters in the world to start dialogue with them.
Selecting Characters
To select a party member, click on their selection circle, their portrait, or press the number button that corresponds to their position in the party, starting with 1 at the left.
To select multiple party members, click and hold anywhere on the screen and drag the marquee over the circles of the party members you'd like to include.
To select the entire party, press the button in the lower center of the screen or the [Backspace] key.
Bestiary - Defeating creatures will progressively unlock their entries in the Bestiary. As you unlock more information in the Bestiary, you will be rewarded more experience.
Combat Attack Results
All characters in the game have four defenses against attacks: Deflection, Fortitude, Reflex, and Will. These defenses are based on their Attributes, level, items, and other effects. The more powerful the character, the higher their defenses will be and the harder they will be to hit or affect with abilities.
The attack roll is a random number between 1 and 100, to which is added the difference between the attack's Accuracy and the targeted defense. If Accuracy is less than the defense, the attack roll suffers a penalty. If Accuracy is greater than the defense, the attack roll gains a bonus.
A higher final attack roll is always better. 0-24 = Miss, 24-49 = Graze, 50-99 = Hit, 100+ = Crit.
A Miss has no effect. A Hit has the standard listed effect. A Graze does less damage and has a shorter duration (for effects). A Crit does more damage, has higher Penetration and a longer duration (for effects).
Quick Items - Utility items like potions, scrolls, explosives, traps, and magical figurines are equipped in a character's Quick Item slots. These items are accessible during combat when hovering over the icon on the character's hotbar.
Companion Reputation - Press the button in the lower center of the screen, or use the [C] key, to bring up the Character Sheet. Select the Reputation tab and then select any companion portrait to see their relationships with other party members.
Reputation - The Watcher's Reputations, Dispositions, and Relationships are displayed via the Reputation Wheel. A companion's Reputation wheel displays their relationships with other party members and any biases they have.
Stealth - Press the button in the lower center of the screen, or use the [Alt] key, to have the selected characters enter or exit Stealth.
Stealth Detection - When a character in Stealth enters the hearing radius or vision cone of a bystander, the bystander will start to detect them. The rate of detection is determined by the character's Stealth skill and the level of the bystander, and it is faster in the vision cone than in the hearing radius. You can hover your cursor over any character while in Stealth to see their hearing radius and vision cone. Some items, such as Noisemakers, can be used to distract and move bystanders while you explore in Stealth.
Traps - Traps and other hidden items can be discovered while exploring. A character's ability to discover hidden items is tied to their Perception and their ability to disarm a detected trap is based on their Mechanics skill. Any character (including enemies) can trigger a trap. Once activated, traps cause Injuries to any character hit by them.
Abilities
Each character has their own Ability Bar that holds all of their active abilities (including spells, powers, invocations, etc.). To use an ability, click it. Some abilities automatically target the user, but most require you to specify a target by clicking on it.
Some abilities target an area of effect (AoE). The most common area of effect is a circle. If your area of effect is displayed as two circles, one larger than the other, friendly characters caught in the margin between the circles will be harmed by it. It is always a safe zone.
Most abilities draw power from a resource unique to each character class. Barbarian, fighter, monk, paladin, ranger, and rogue abilities draw from a pool that is full at the start of every combat. Each ability subtracts a cost from that resource until it is entirely exhausted.
Unlike barbarians and fighters, druids, priests, and wizards do have a common resource pool for all of their abilities. Instead, in each fight, they can cast a number of spells from each spell level they have access to.
Chanters, ciphers, and monks start with a fraction of their total resource pool and must build it up over time in each fight. Each class gains their resource in a different way. Unlike all other classes, they can continue to replenish their resources throughout a fight.
Armor and Penetration - Characters have Armor Ratings that represent their ability to resist Penetration from different damage types. Attacks that cause damage have a Penetration value that is used to determine how easily they can overcome the target's Armor Rating. If an attack's Penetration is equal to or higher than the target's Armor Rating of the corresponding damage type, it does full damage. If the attack's Penetration is lower than the target's Armor Rating, it will do less damage for each point of difference. If an attack's Penetration is at least double the target's Armor Rating, it gains a bonus to damage.
Engagement - One of your characters has been Engaged in melee. If an Engaged character moves away from the character Engaging them, they will provoke a Disengagement Attack. An Interrupt, such as the fighter's Knockdown, can break Engagement to allow a safe exit. Some abilities, such as the rogue's Escape, allow a character to get away without provoking a Disengagement Attack.
Interrupt - Some abilities specify that they can Interrupt a character. When a character is hit with an Interrupt, their current action is lost, along with any resources (including Quick Items) they were using. Interrupts can be blocked by Concentration. If a character with Concentration is hit by an Interrupt, they lose their Concentration, but are not Interrupted.
Injuries and Rest - Triggering a trap or being knocked out during combat will apply an Injury to that character. Injuries remain on a character until they use food or drink while resting, or by resting at an inn. Press the button in the lower center of the screen, or use the [R] key, to Rest.
Rest Bonuses - A party member has gained a rest bonus. These bonuses are aqcuired by resting at an inn or by using food or drink while resting in other locations. Rest bonuses always last until the next time the character rests.
Level Up Your character has earned enough experience to advance a level. Click the + icon on their portrait to level them up.
Empower - You can now Empower your abilities or yourself. Once per fight, you can use Empower on an active ability to make it much stronger. Alternately, you can use Empower on yourself to replenish a portion of your ability resources.
Chants
When you have a Chanter selected, clicking on their hotbar will allow you to create Chants. Chants are the battle songs Chanters use to strengthen their friends and diminish their foes.
Clicking on a Chant will show the Phrases it uses. Phrases selected on the left panel will be added to the selected Chant. To remove a Phrase, just click on the Phrase in the selected Chant.
An active Chant will automatically play through each Phrase in order and loop back to the beginning when it reaches the end.
World Map - Clicking on the World Map will have your party navigate to the selected location. To toggle on/off the camera automatically following the party, click the Follow Camera On option in the bottom right.
Reputation
Press the button in the lower center of the screen, or use the [C] key, to bring up the Character Sheet. Select the Reputation tab to view your character's earned faction and community Reputations. Factions will display how much positive reputation you have with a blue bar and how much negative reputation with a red bar.
Crew members are needed for your ship. You can recruit crew members at most inns in port cities. Click to view the available crew members available at an inn. Once you hire a crew member, you have to assign them to an active position on your ship. Crew members that are not placed on your ship are not active and will cost no food, drink, or wages.
Grimoire
Grimoires allow wizards to cast spells they have not yet learned. To cast the spells in a grimoire, it must be equipped in the wizard's grimoire slot. A wizard can quickly switch between grimoires in combat by placing additional grimoires in their Quick Item slots.
To view spells included in a grimoire, right-click on it or click the ? icon in inventory, then click on the grimoire. Note that although grimoires give access to many powerful spells, a wizard cannot cast a spell out of a grimoire if they are not high enough level to access spells of that level.
Ingredients - You have found an ingredient. Ingredients can be used to enchant unique weapons, armor, and shields as well as to craft food, scrolls, potions, and other items. Select in the Party Stash to view your Ingredients.
Enchanting - Unique (with a gold border) weapons, armor, and shields can be enchanted to further increase their potency. Each enchanting recipe requires a number of specific ingredients. When you have the ingredients to perform an enchantment on an item, it will display a + in the upper left corner of the item's icon.
Hidden Objects - Hidden objects can be discovered while exploring. A character's ability to discover hidden items is tied to their Perception.
Counters - A Counter is any ability or effect that removes and grants immunity to another category of effects when applied. There are two types of Counters: Inspirations and Keywords. Inspirations are grouped by Attribute (e.g. Dexterity, Perception) and automatically counter and grant immunity to the corresponding group of Afflictions for that Attribute.
Party AI - If you would like your party members to perform actions automatically in combat, you can select AI behaviors for them. Each class has multiple behaviors to choose from based on different roles they can fulfill. You also have the ability to fully customize or create new behaviors by opening the Behavior Editor.
Embark - While on the deck of your ship, you can select to access the World Map.
Ship's Captain - The Watcher is the ship's captain. Like other members of the crew, they gain Sailor Experience, but the captain's Sailor Experience always advances their Captain rank.
Ship UI
There are several jobs on the ship that the crew needs to fill while sailing. Every ship needs deckhands, cannoneers, and a helmsman and all ships benefit from having a cook, surgeon, and navigator onboard. The larger ships even require a boatswain to keep the deckhands in order.
To place a new sailor on the ship, you must be in a port. Click an available sailor from the Known Sailors section and move them to an open role on the ship. Note that each sailor has different talents. Not all sailors will be well-suited for a given job. Filter through the Known Sailor job types to see who excels at each role.
Your crew consumes both food and drink while adventuring. The type of food and drink you feed them will adjust their morale. More expensive provisions make them happier. Cheap food and drink will lower their morale over time.
Even so, few things will impact your crew's morale as badly as letting them starve. A starving crew with low morale may mutiny. If neglected for long enough, some may even die.
There are several jobs on a ship.
The captain determines how likely the ship is to gain advantage (first move and other bonuses) in ship-to-ship combat.
Deckhands are required to perform any maneuvers in ship-to-ship combat. If a ship does not have enough deckhands, it will move more slowly on the World Map. The more skilled deckhands a ship has, the faster it will move in combat.
The boatswain counts as a deckhand, but is more important for their ability to accelerate the completion of special events (such as putting out a deck fire) on the ship by coordinating their actions.
A helmsman is required for turning and jibe actions in ship-to-ship combat. More experienced helmsmen make the ship harder to hit after performing turn and jibe actions.
Cannons cannot fire without a cannoneer assigned to them. The more experienced a cannoneer, the more accurate their fire.
The surgeon increases the rate of healing for injured crew members in Reserve, both in combat and while traveling.
Two jobs have no combat roles, but may be called upon to resolve ship events.
The navigator increases speed on the World Map and the cook reduces food consumption while traveling.
Sea Navigation - Click on the Known Locations dropdown list to bring up a list of places you have discovered. You can also search for a location by name. Ships travel faster in deep water, slower in shallows.
Low Rations - Food and water are consumed per day by your crew. You will need to replenish these resources by finding or purchasing them. Press the button to manage your ship. Restock your food and drink by purchasing those supplies and placing them in the appropriate queue. Provisions are always consumed from left to right.
No Rations - Traveling without food or drink will starve your crew, lowering their morale and eventually causing them to die or mutiny against you.
Low Morale - If your crew has very low morale, it may eventually lead to a mutiny. You can improve your crew's morale by feeding them more expensive provisions, by defeating enemy ships, and by sharing the spoils of those victories with them.
Ship-to-Ship Combat
In Deadfire, not every ship on the sea is friendly. Hostile ships can attempt to engage you in ship-to-ship combat.
During ship combat, distance and orientation to the enemy are vital to your success. Distance determines if the enemy is in range of your cannons (or if you are in range of theirs). Orientation determines what cannons (if any) you can fire, as well as how easily your ship may be hit. Turning your side to the enemy may allow you to fire the most cannons, but it makes you an easier target.
Each ship must maintain its Sails and Hull. Damaged Sails limit the speed of a ship. If a Hull is destroyed, the ship will sink. A ship's cannons are also limited by how much Ammunition the ship is carrying.
When two ships get close to each other, they can board or ram. Boarding locks the two ships together and transitions to a deck-to-deck fight between the two ship crews. A ramming attack does damage to the Hulls of both ships. If one does not sink, the battle transitions to a deck-to-deck battle.
Once you have victorously sunk the other ship or defeated them in deck-to-deck combat, you can plunder what remains. Plunder typically includes ship resources, treasure, and occasionally the unique triumph of a noteworthy enemy captain. Coins can be shared with the crew to improve morale and triumphs are always flown from your ship's rigging.
Crew Injuries - Injuries can occur during ship battles and encounters at sea. They limit the abilities of crew members. During combat, you can use the Report to... command to move an injured crew member to the Reserve to be healed by the ship's surgeon. They cannot perform their job during a battle while injured unless the surgeon attends to them.
Sailor Experience - Completing encounters and defeating enemy captains at sea earns Sailor Experience for the crew and captain. Acquiring Sailor Experience will increase the ranks of a crew member's current job. Crew members can increase ranks in jobs they aleady have at least one rank in. The captain always advances their Captain rank.
Sailor Traits - Crew members naturally progress in their assigned jobs when they earn Sailor Experience. Crew members can only advance in jobs they have at least one rank in. Ordinary crew jobs have a maximum of 4 ranks. The Watcher gains ranks as the captain, up to a maximum of 5.
Port Shop - While on a city map, you can select to use the Port Shop and resupply your ship.
Near Death - A party member has three Injuries. If they gain a fourth Injury, they will die. Heal Injuries by using food or drink while resting or by resting at an inn.
Death - A party member has died. Party members can die from receiving four Injuries without healing them or by being hit with a powerful destruction effect. Heal injuries by using food or drink while resting or by resting at an inn.
Companion Conversations - One of your companions wants to talk. To initiate conversation with a companion, select them and then click on the ability bar.
Reputation UI - The Watcher's Reputations and Dispositions are displayed on the Reputation Wheel. A companion's Reputation Wheel displays their reputations with other party members and any biases they might have.
Ship Events - Sometimes, an attack on your ship will cause a ship event. This is an ongoing problem that you must assign crew members to deal with. Use the Report to... command to assign crew members to an event. The more crew members assigned to the event, the faster the event will be resolved.
Accuracy - Accuracy is the score used to determine if an attack hits a target, regardless of attack type. Accuracy is opposed by one of the target's four defenses (Deflection, Fortitude, Reflex, and Will). The higher Accuracy is compared to the target defense, the higher the chance to Hit.
Armor - Balance your armor choices based on your character roles. Most front line characters do best in medium and heavy armor. Even monks and rogues can benefit from a bit of extra protection!
Deflection - Deflection is one of the four defenses (the others are Fortitude, Reflex, and Will). It opposes most melee and ranged weapon attacks as well as many spells that directly target an individual with weapon-like attacks.
Empower - All party members can Empower an ability or recharge their depleted resources once per encounter. An Empowered ability is cast as though the user were 10 levels higher. An Empowered character regains half of all their Per Encounter resources. Characters can only use a fixed number of Empowers between rests.
Fortitude - Fortitude is one of the four defenses (the others are Deflection, Reflex, and Will). It opposes attacks targeting the physical resilience of the character, such as Knock Down, Noxious Burst, and most poisons.
Injuries - If a party member gets knocked out in combat or has a mishap in a scripted interaction, they will suffer an Injury. Injuries cause a variety of negative effects and, if a character suffers more than three of them, can even be fatal. Eating food while resting will remove all of a character's injuries.
Penetration - Most attacks that do damage have a Penetration rating. If the attack's Penetration is below the target's Armor Rating in that damage type, it will do much less damage. When Penetration is at least double the target's Armor Rating, the attack gains a bonus to damage.
Power Level - All active abilities increase in effectiveness - number of projectiles, damage, duration, Penetration - as a character's Power Level rises. This can keep even low-level abilities effective as characters advance.
Reflex - Reflex is one of the four defenses (the others are Deflection, Fortitude, and Will). It opposes most area-targeting attacks that cause damage or grab at characters such as Fireball, Tanglefoot, or a dragon's breath.
Safe Radius - The base area of effect for many spells can be increased by Intellect and magic items. This growth is represented by a second, larger, targeting circle. Characters in the enlarged area of effect are safe from an ally's hostile attacks.
Will - Will is one of the four defenses (the others are Deflection, Fortitude, and Reflexes). It opposes most mental attacks, such as Halt, Whisper of Treason, or a fampyr's Charm Gaze.
All your comments, suggestions and corrections are very welcome. Your experience helps other players. We invite you to add comments, thank you.